If you can dream it, you can create it.
But first you have to be able to draw it in two point perspective.
Helllooo GUT peeps.
So, I’ve gone rogue. The news in the world is so hard this weekend, and Fall overwhelm is all around, so I’ve decided to go ahead and remove the GUT paywall for all of October. All the lessons, the weekly drawing assignments, and the GUT creative community art share/chat is open to EVERYONE this month. ❤️
If you have been curious about the weekly drawing and community art shares and haven’t yet joined in, I hope you use this opportunity to jump into the chat and meet other creative-minded folks, or just check out all the inspiring artwork the GUT community is creating. I firmly believe nobody can maintain a creative practice alone. We MUST create in community, and in conversation. And I sincerely believe the GUT is the best most encouraging and accessible creative community on the internet. So let’s ALL do this together this month.
Beloved GUT members, thank you for generously welcoming visitors to our community. 🙏
Here’s a peek at what’s coming up:
Next Sunday I’ll have a full page drawn story coming out in The New York Times, and next weekend I’ll give y’all a peek Behind the Scenes on how that piece came to be and offer an assignment related to the topic.
Also, in person next week: GUT members Anne and Jenny are organizing the first Bay Area DrawTogether GUT in person drawing session on Friday, October 13. Details at the bottom of this dispatch! Anne also drafted this spreadsheet as a way to collect GUT members’ contact information everywhere in the world - hopefully this can help anyone interested self-organizing in person meet-ups in local areas. Add your name if you’re interested in meeting up with other DT GUT peeps and drawing together. Thank you, Anne and Jenny. *tears up*
The week after that we’ll have a very special GUT Visiting Artist: Author Gretchen Rubin of The Happiness Project. Gretchen will join us for a Q&A, we will offer a collaborative assignment for DT GUT peeps and Gretchen’s community, and we’ll have a live conversation on instagram later in the week.
So that’s the future.
Now let’s get some perspective on the present, and get into this week’s drawing.
Earlier this year I shared part one of a series on perspective: what perspective is and where it came from and how to draw in one point perspective. Today, we are doing part two of our perspective series: Drawing in Two Point Perspective.
If you’re scared by perspective drawing, join the club. Everyone is. I am and I’m teaching it to you!! But I promise this lesson is super easy and approachable.
And while the GUT doesn’t care about doing things the “right way”, knowing how to draw in perspective unlocks the ability to accurately represent anything we can imagine in 3D on a 2D piece of paper. That’s powerful.
Special supplies for today: You’re going to need paper, pencil, a ruler and an eraser. And a pen and colors if you want.
Now let’s get a little perspective.
Perspective, PART TWO: Two Point Perspective
Perspective is how we represent a 3D world in a 2D space. There are different ways to draw perspective: 1, 2, 3, 4, 5 and 6 point perspective. But we really only need to understand 1 and 2.
ONE POINT PERSPECTIVE: In one point perspective, one surface of the object always faces the viewer, and one side recedes into the distance.
WE DID A LESSON ON ONE POINT PERSPECTIVE EARLIER THIS YEAR. IF YOU MISSED IT, PLEASE STOP READING AND GO BACK AND DO THIS LESSON FIRST. Not to freak you out, but doing that will seriously make this lesson so, so much easier. Also it was a super fun assignment and SO MUCH great art came out of it. I know you’ll dig it. And if you have done it, great. Awesome. Okay, let’s carry on.
TWO POINT PERSPECTIVE: When we draw in 2 point perspective, the object is turned at an angle. The corner of the object faces us, and two sides recede into the distance.
Now let’s do a quick little review of perspective in general and dive in.
Four elements of perspective
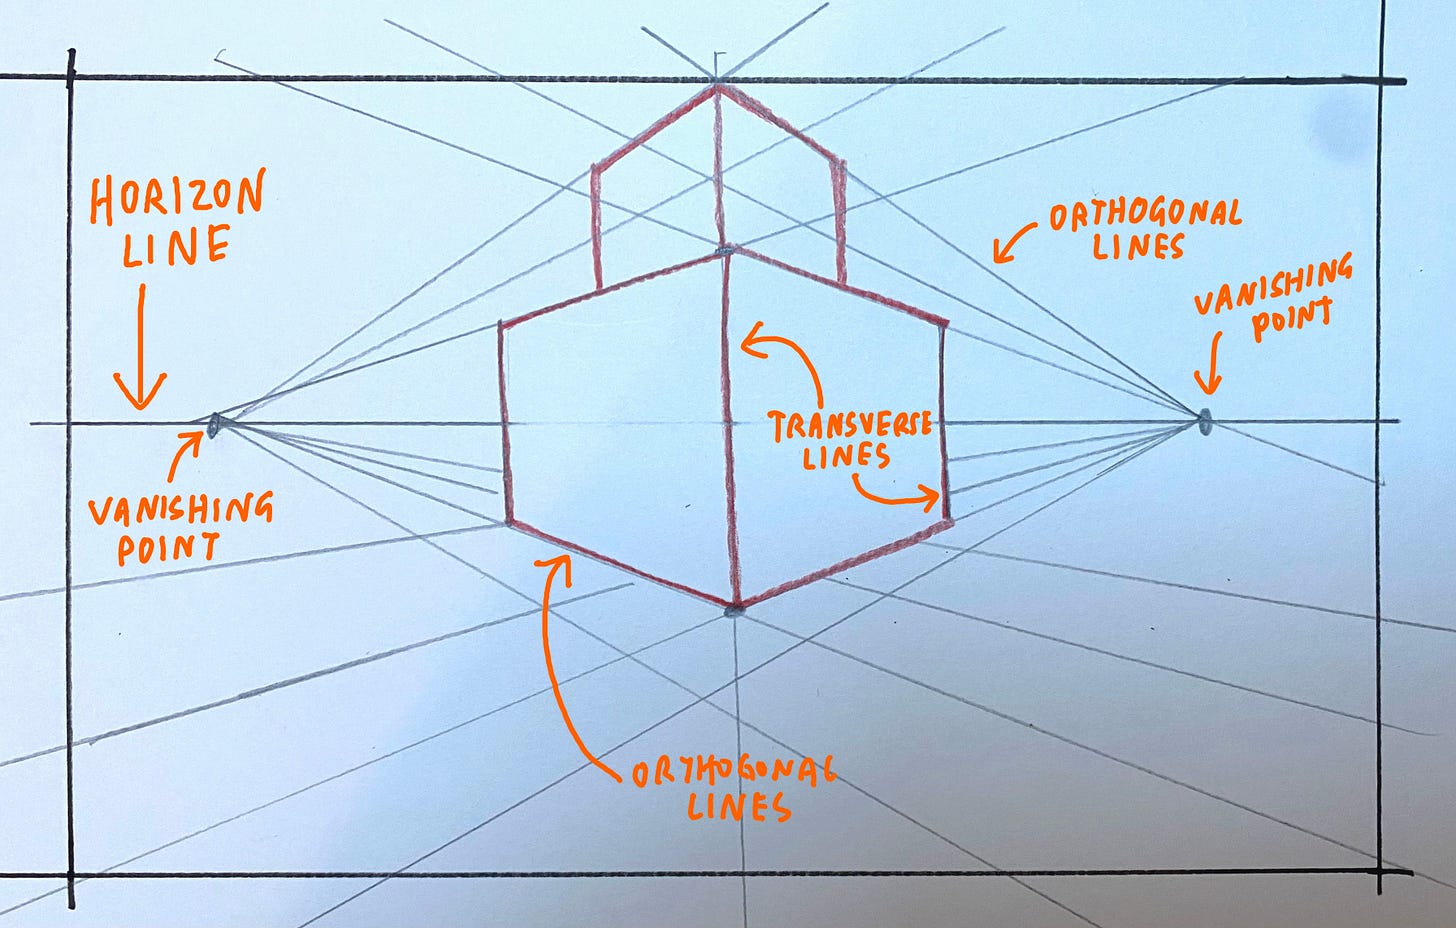
The elements we use to draw in perspective are the horizon line, vanishing point(s), orthogonal lines, and transverse lines. Let’s review these and note how we use them to draw in TWO point perspective, as opposed to how we use them to draw in ONE point perspective.
Horizon line
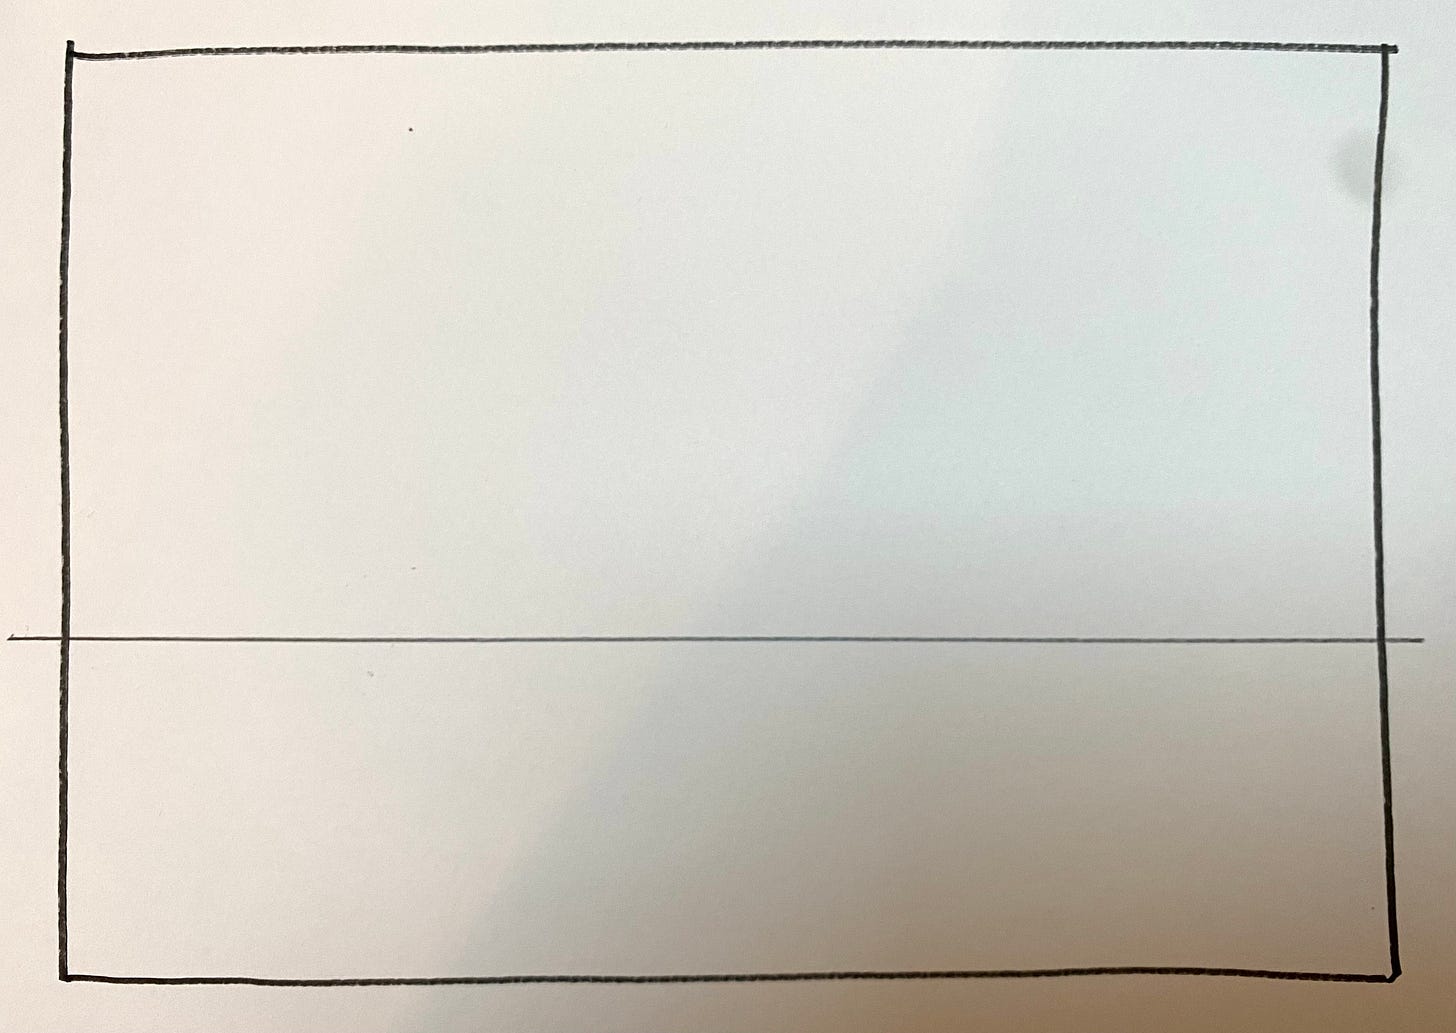
The horizon line is a horizontal line that cuts across the surface of a drawing or painting. This line represents the edge of the earth. It’s also eye level. If we draw it across the center of the page, the viewer perceives the objects in the drawing as being at eye level. If we draw it low on the page, the viewer looks UP at the objects. If we draw it high across the page, the viewer looks DOWN at the objects. Where we place the horizon line creates a story for the viewer. This wonderful moment from Spielberg’s The Fablemans explains why that’s so important:
Vanishing point
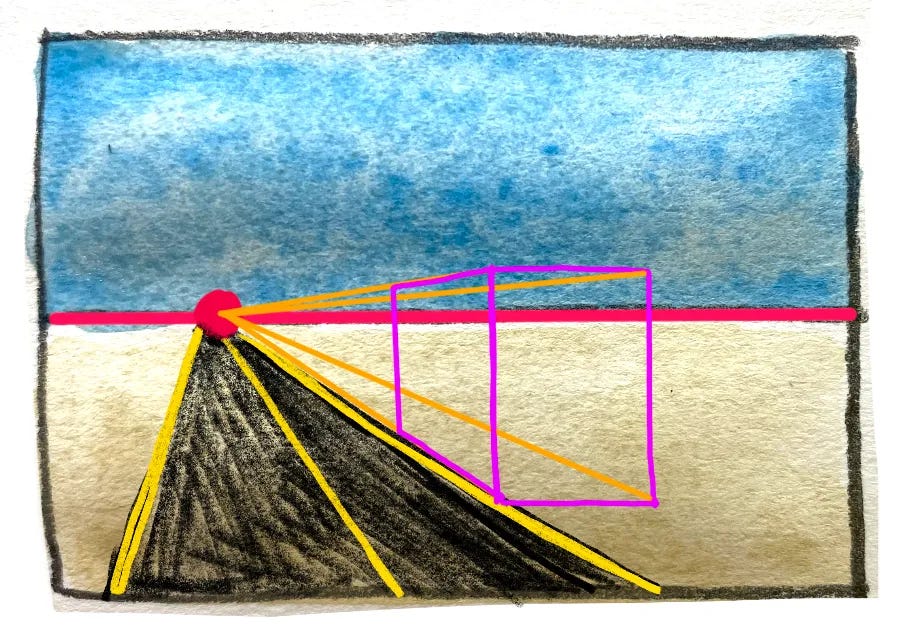
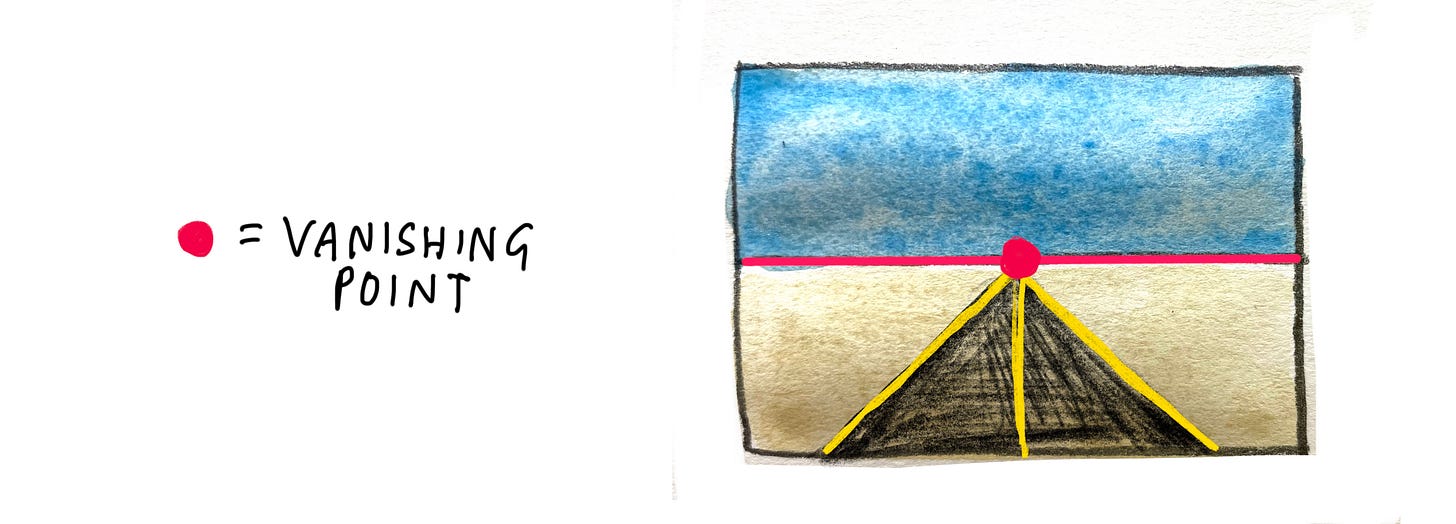
In one point perspective there is one vanishing point on the horizon. Imagine a long road running straight into the distance and disappearing at the horizon line. The point where the road disappears is the vanishing point.
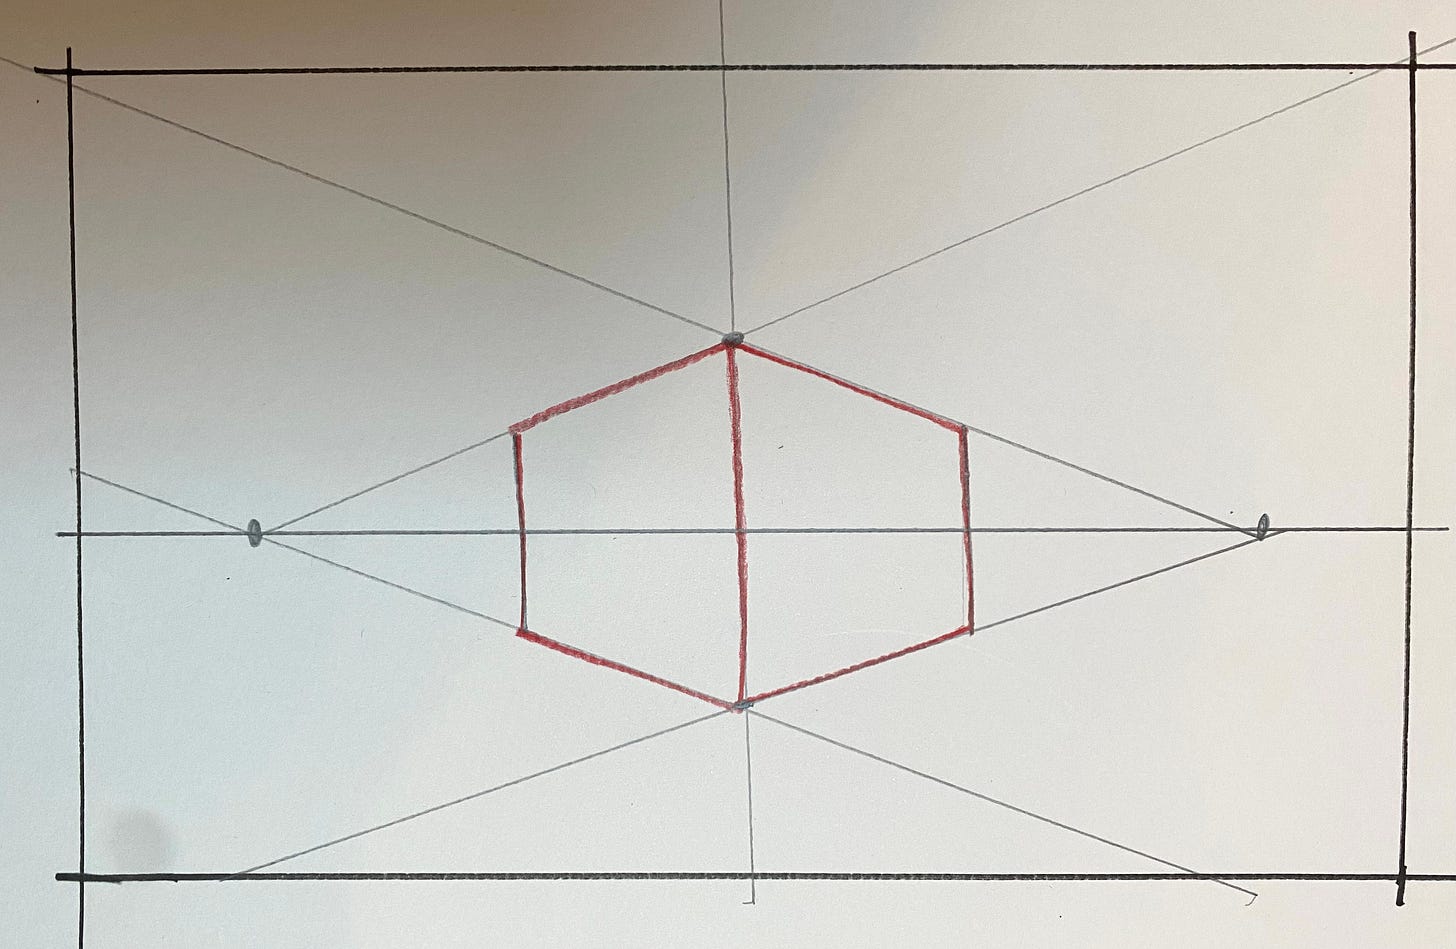
When we draw in two-point perspective, we place TWO Vanishing points on the horizon. Why? Because we’re drawing an object at an angle, there are two sides receding. So we need two points for them to recede into! Here, it looks like this:
See how those two points become the places where things disappear into, just like the road? And those diagonal guidelines coming out of the vanishing points, what are those called?…
Orthogonal Lines
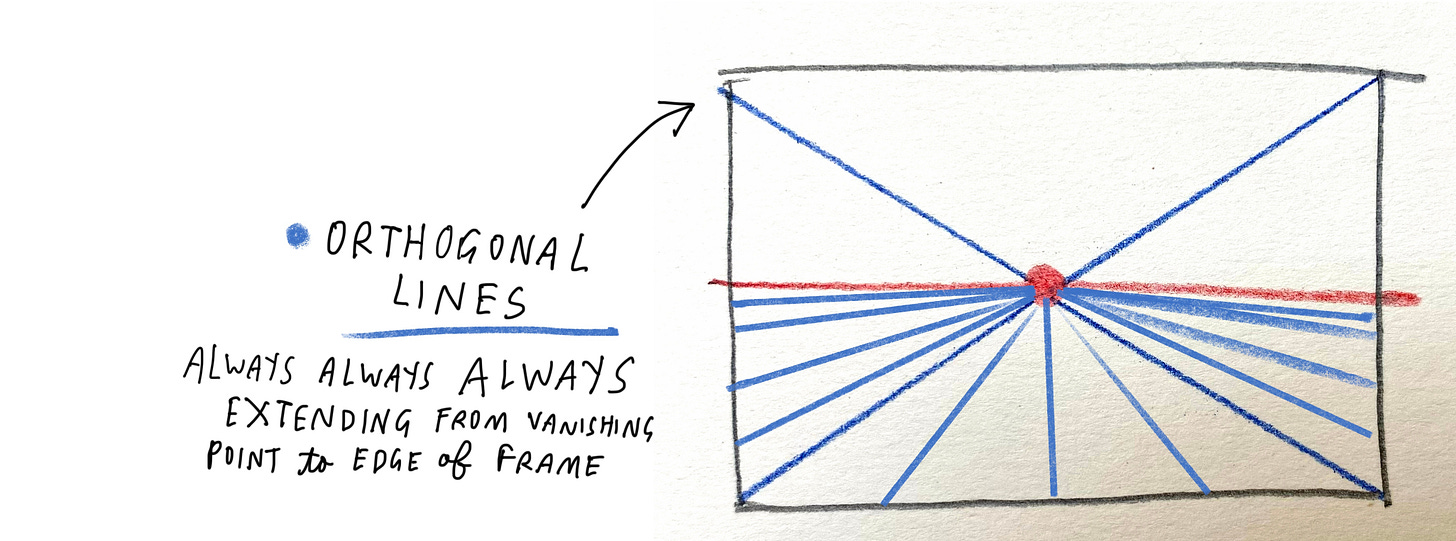
When we draw in one point perspective, we draw orthogonal lines emerging from the vanishing point and emanating in all directions. That becomes the ground (and sky) in which we place objects.
When we draw in two point perspective, we draw these lines coming out of the two vanishing points.
There can be as many orthogonal lines as you want, and they can emerge in any direction. But you have to make sure they are STRAIGHT (use a ruler or straight edge to draw them) and you need to make sure that the lines are all coming of/receding into the exact same spot. Even a hair off will make the drawing appear wonky. (Of course, if you wanna go wonky, wonk out! see what happens! No rules in art.)
And the edges of your object will always ALWAYS follow those orthogonal lines. (More on that in a minute.)
Last thing: The vertical lines of the object - the edges that go up and down - those lines are called….
Transverse Lines
Transverse lines are the vertical lines of your object. How tall and far apart they are establish the objects height and width.
And that’s it.
Let’s see all that laid out:
Maybe that’s actually overwhelming. But if you did PART ONE of this series on perspective, it should feel more comfortable and makesense. (I hope!)
Alright, now that you understand the parts and what they do, here are two examples of how we can put them together to make a drawing.
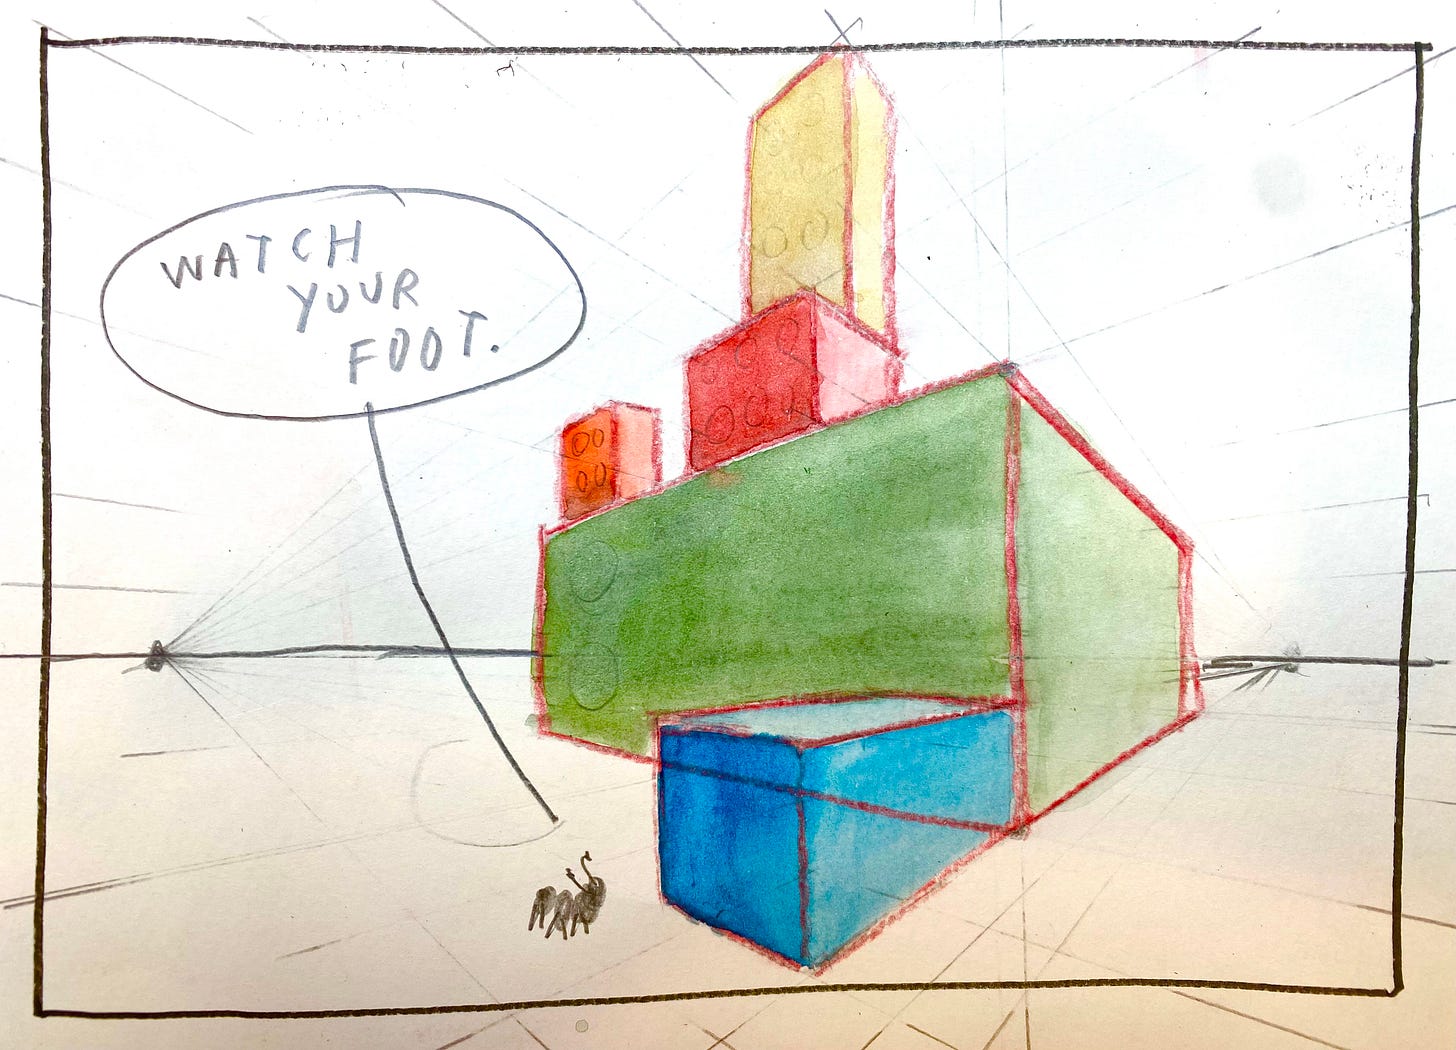
EXAMPLE 1: Legos as seen by an ant.
Alright, say I want to draw a stack of legos on the ground, as seen by a passing ant.
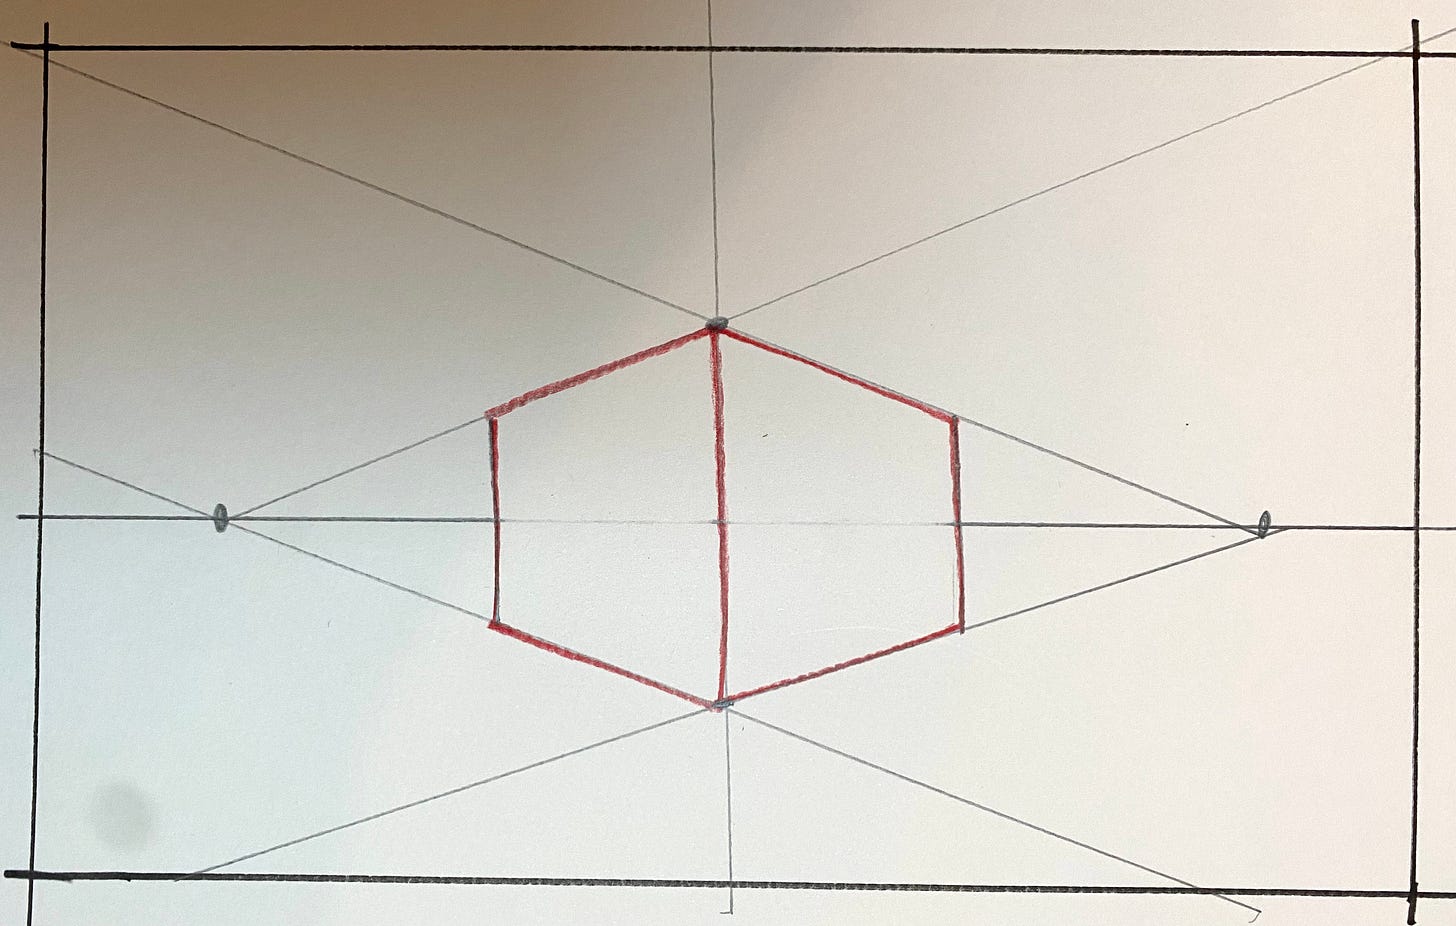
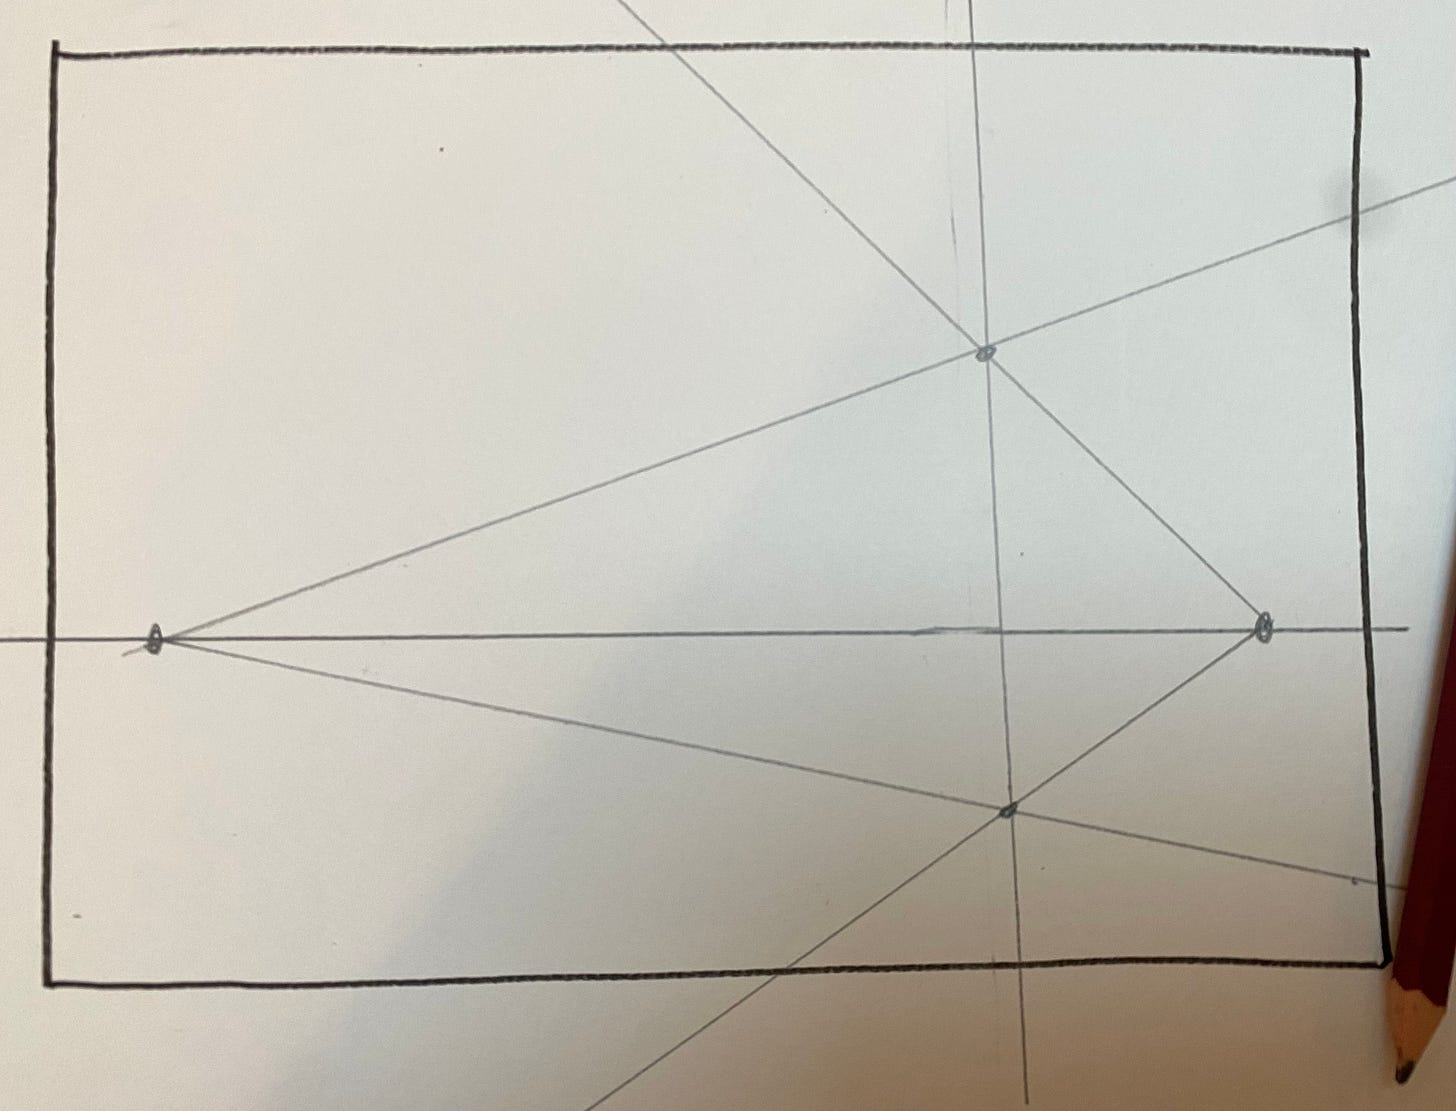
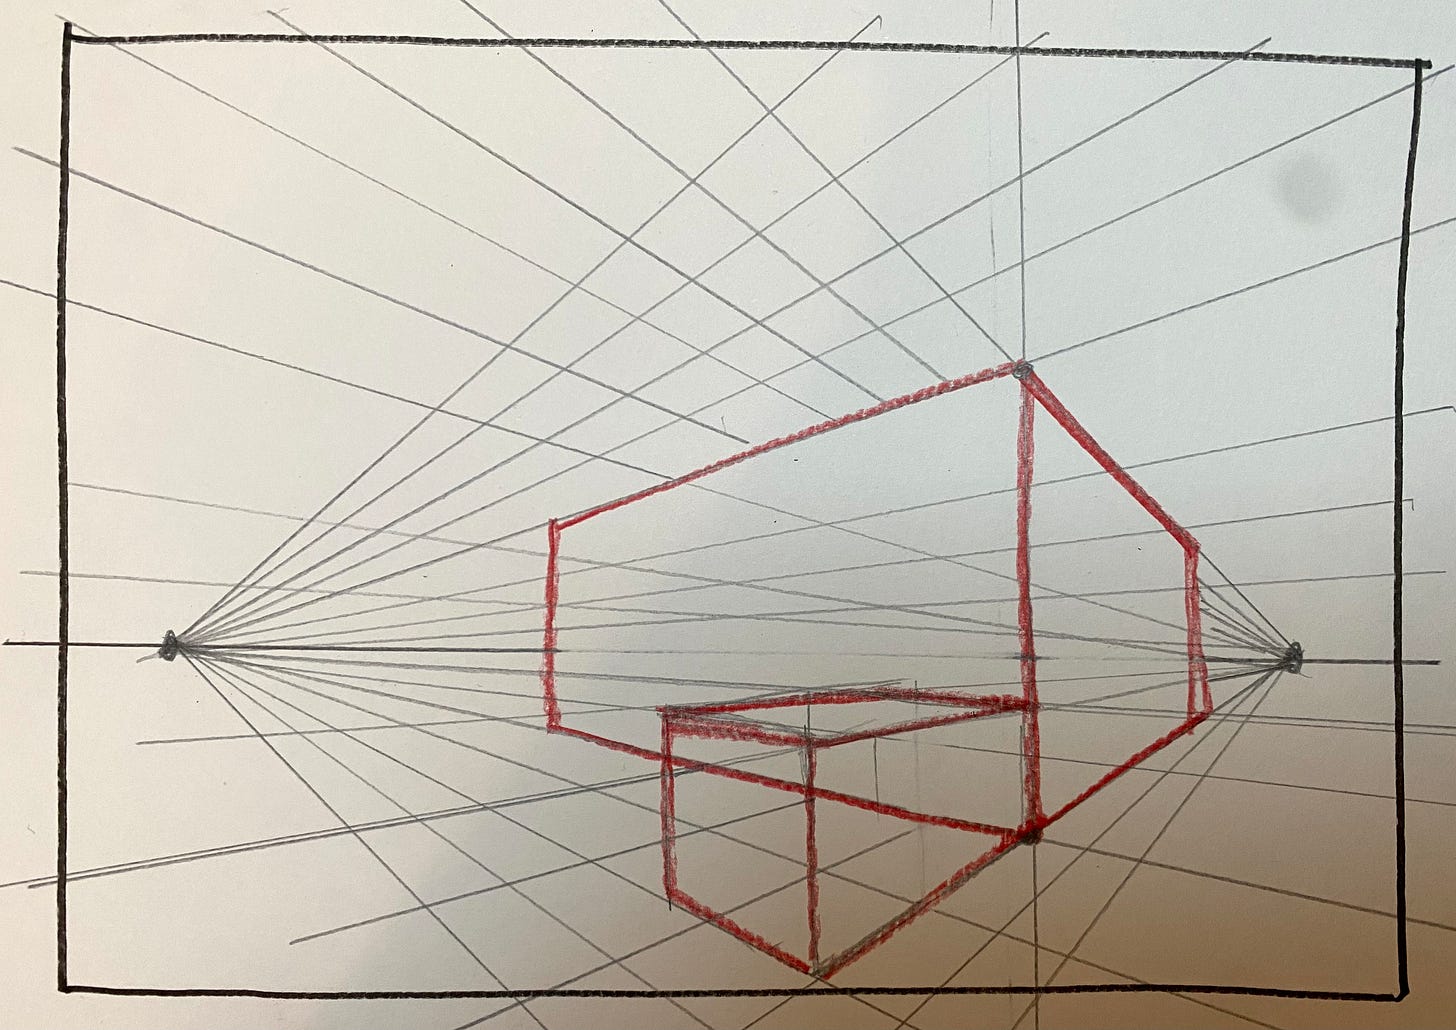
Because the and would be looking UP, I’m going to use my ruler to draw the horizon line sort of low in the frame. Then I put in my two vanishing points. It’s best to place them at a distance to avoid distortion.
I also put a transverse line cutting through it, with a top and bottom mark. That’s where I want the edge of my primary lego to be and how tall it will be. It’s just an easy way to start.
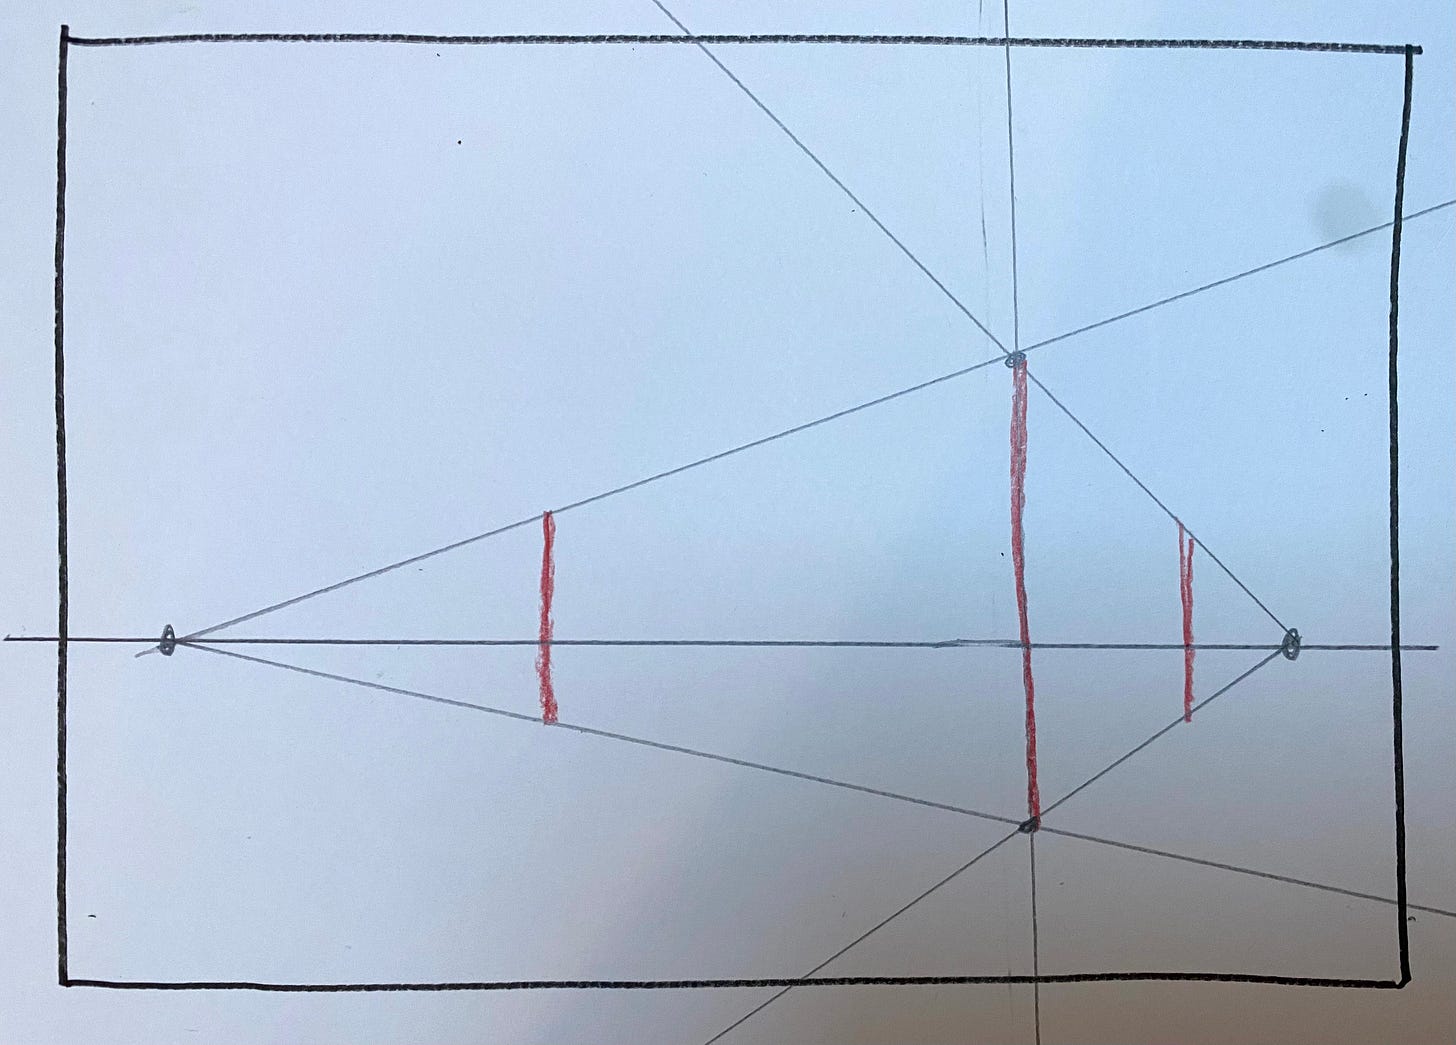
Next, I use my ruler to draw Orthogonal lines emanating from the vanishing points through those top and bottom points along the transverse line.
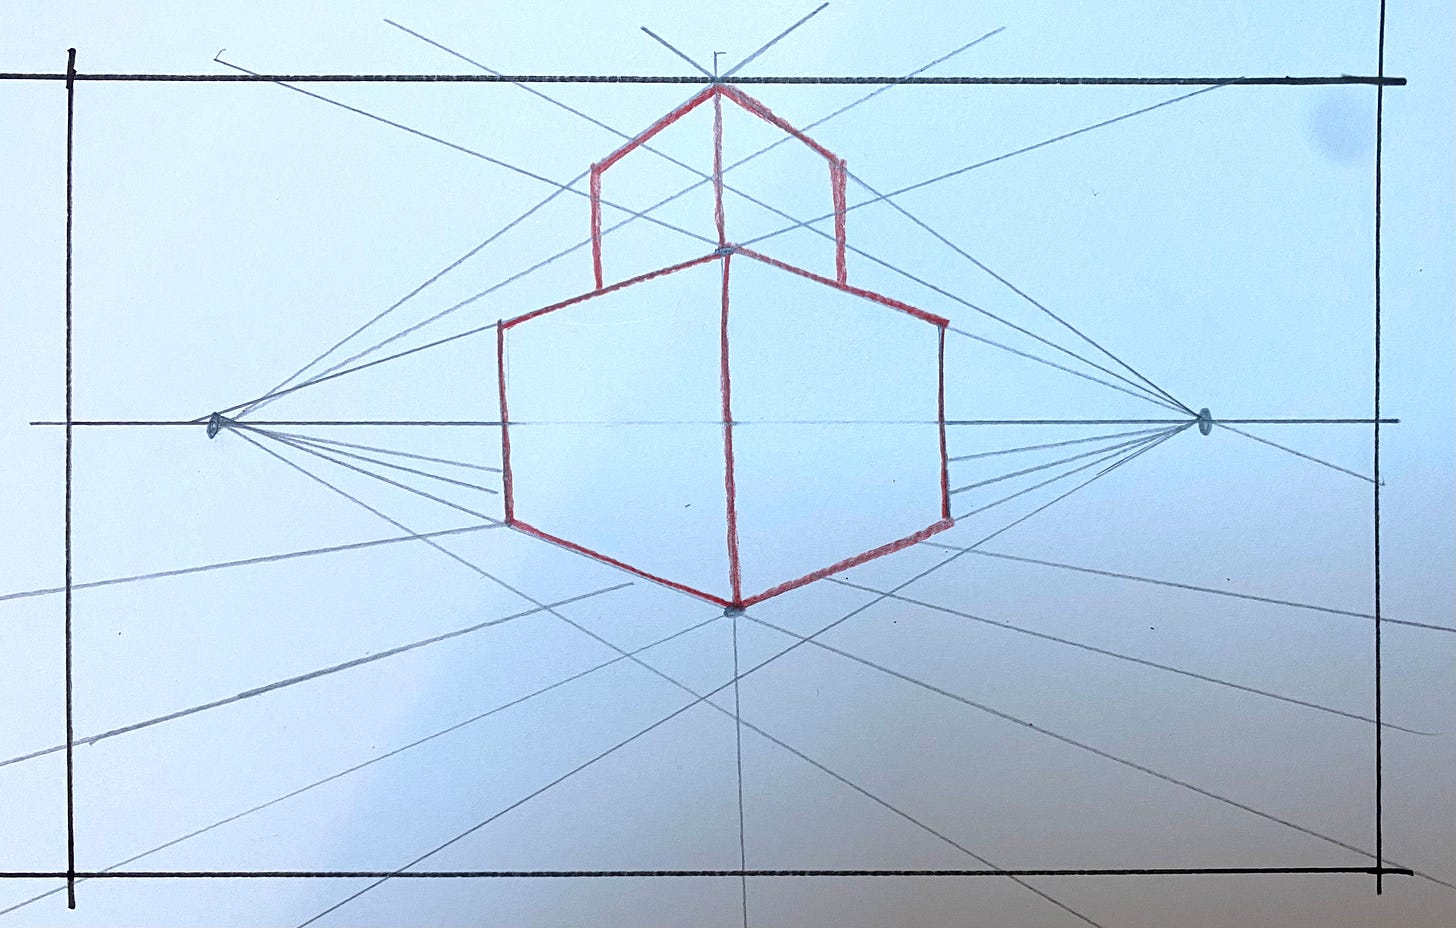
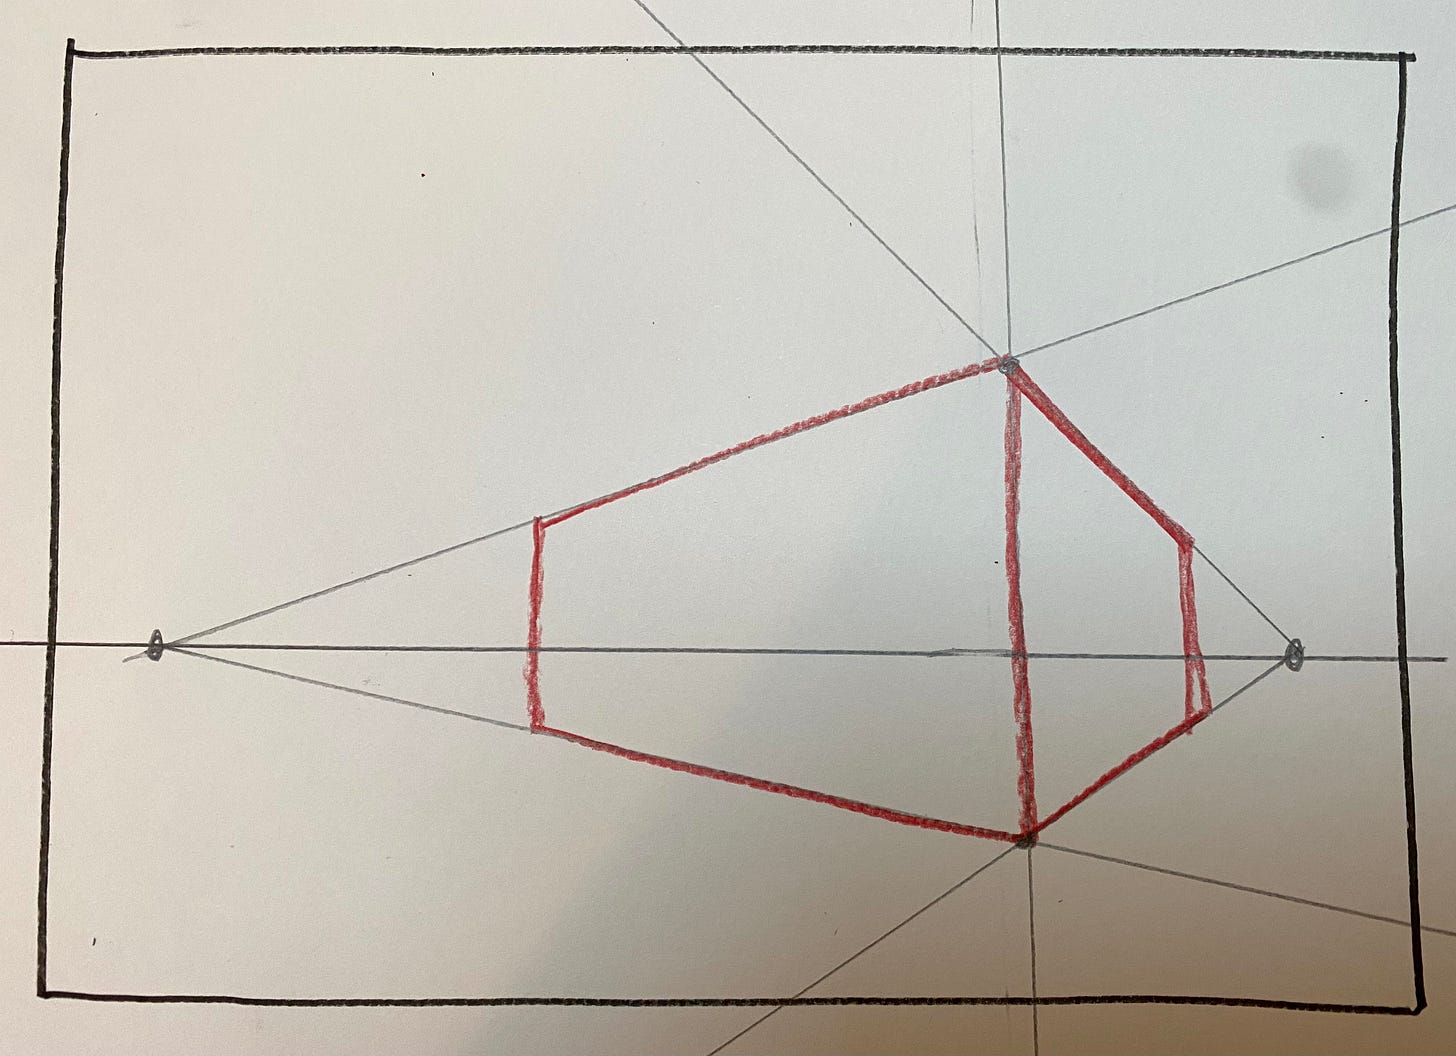
Suddenly an object begins to appear. Now I’m going to draw transverse lines to create the vertical edges of my object. And BOOM, suddenly there it is….
Now I just need to trace those orthogonal lines and connect the edges of the object. That’s it. Giant lego number one is done, and totally “in perspective.”
Now, there’s no fun in ONE lego. I want to draw more! So I’ll need to draw more orthogonal lines to figure out how/where to draw them so they are in perspective.
So I take my ruler and draw more lines coming out of the vanishing points that I can use as guides for more objects. And then I start doing the same thing I did just before, but in different places. And then I add transverse lines and start to build more legos.
And more legos.
And suddenly we have a city of legos.
As viewed by an ant.
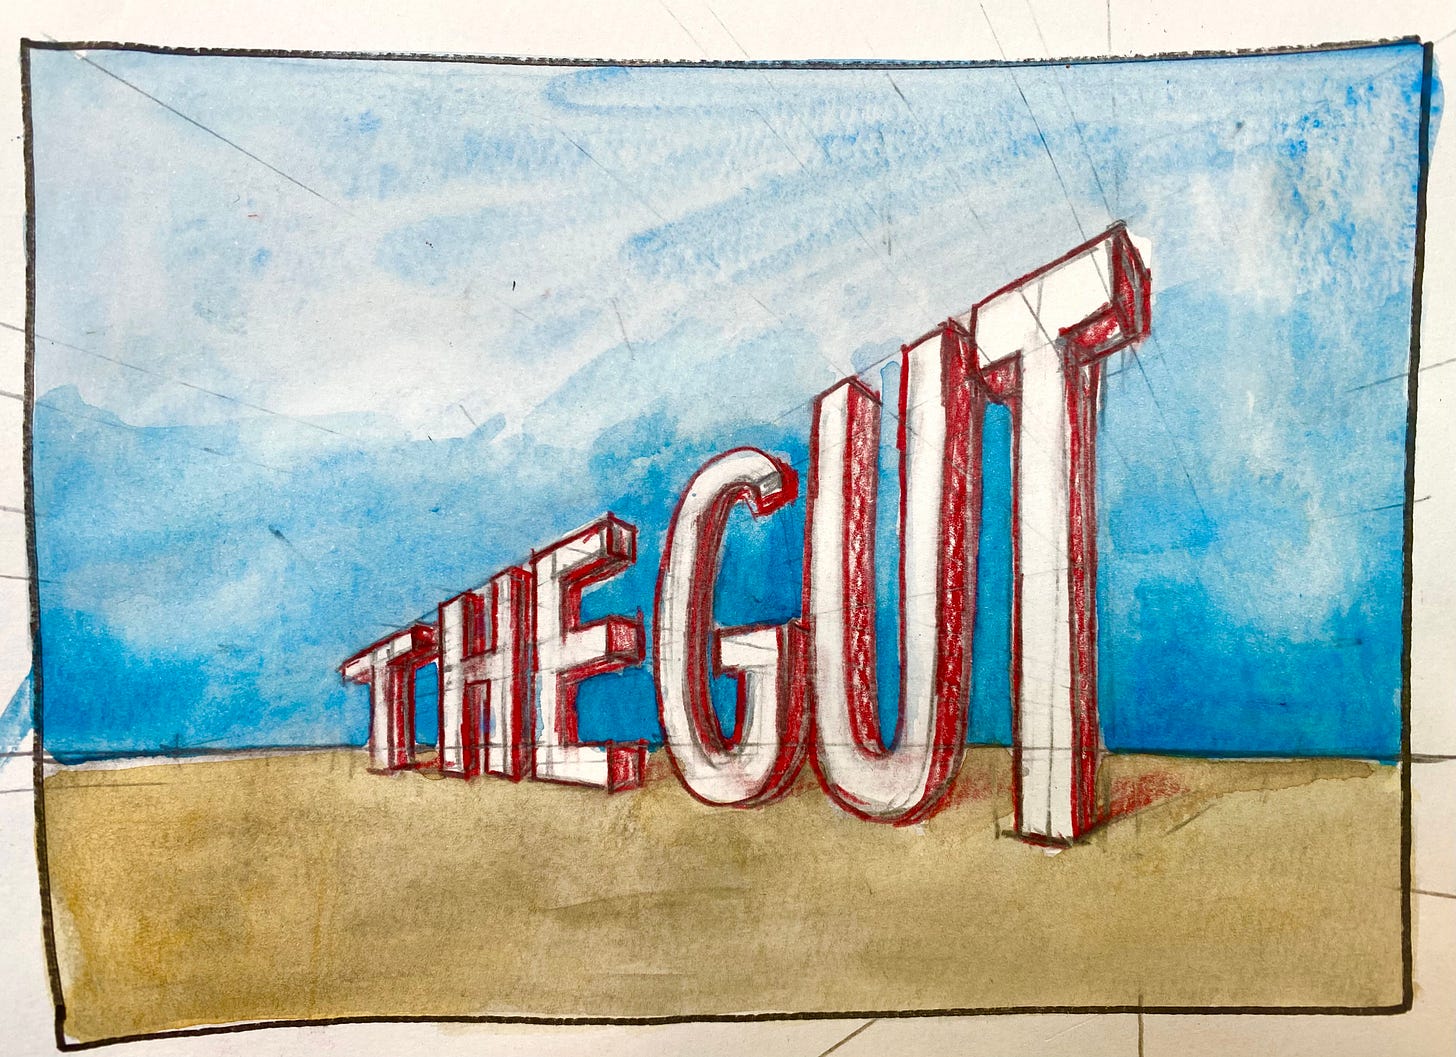
EXAMPLE 2: 3D Lettering.
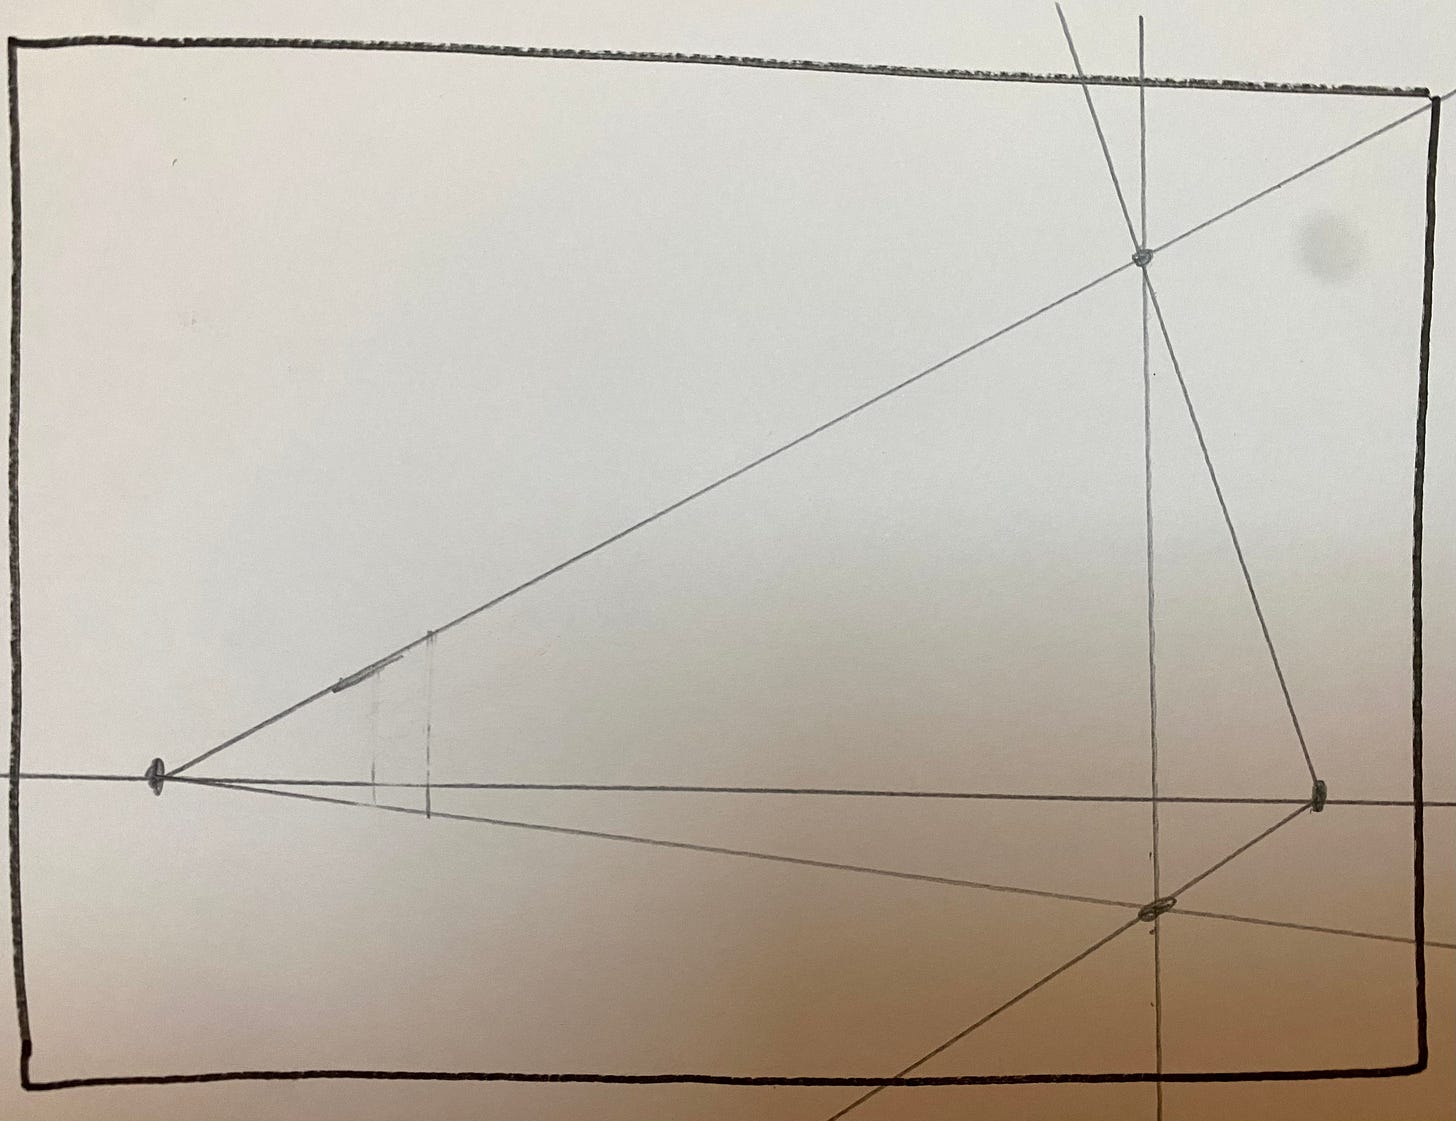
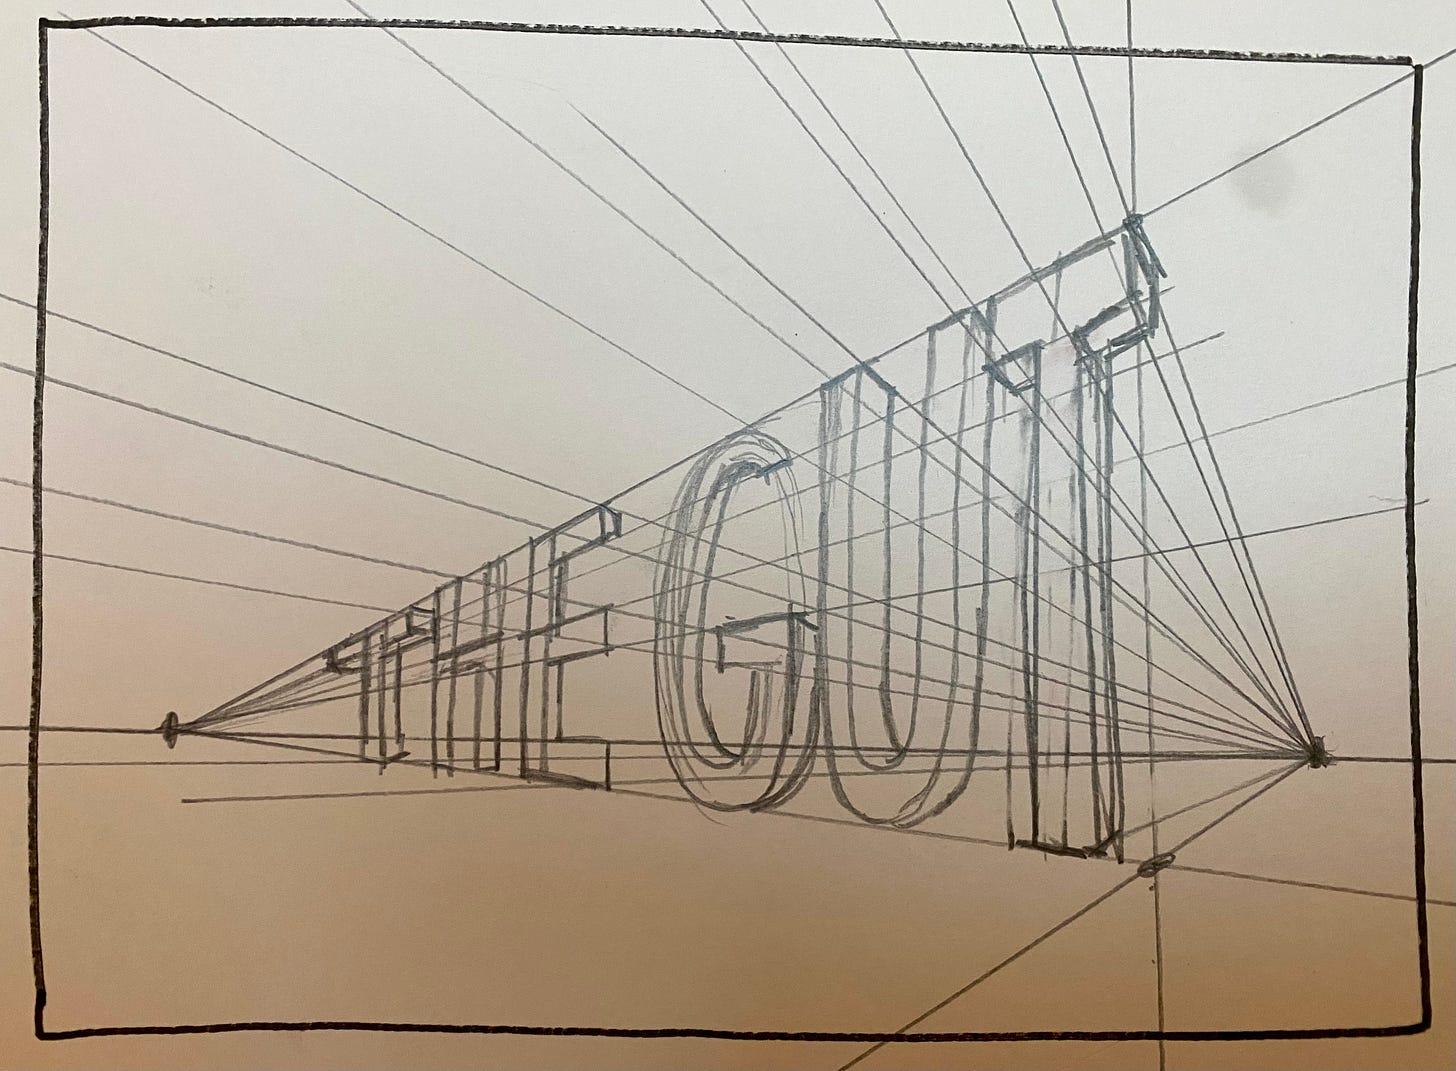
I wanted to try writing a giant “GUT” in two point perspective. So I stared the same way I did with the legos, but moved the horizon line even lower, and scooted the main transverse line to the right, where I wanted the words to end.
Next, I used my ruler to draw those primary orthogonal lines. That created the guidelines for the piece.
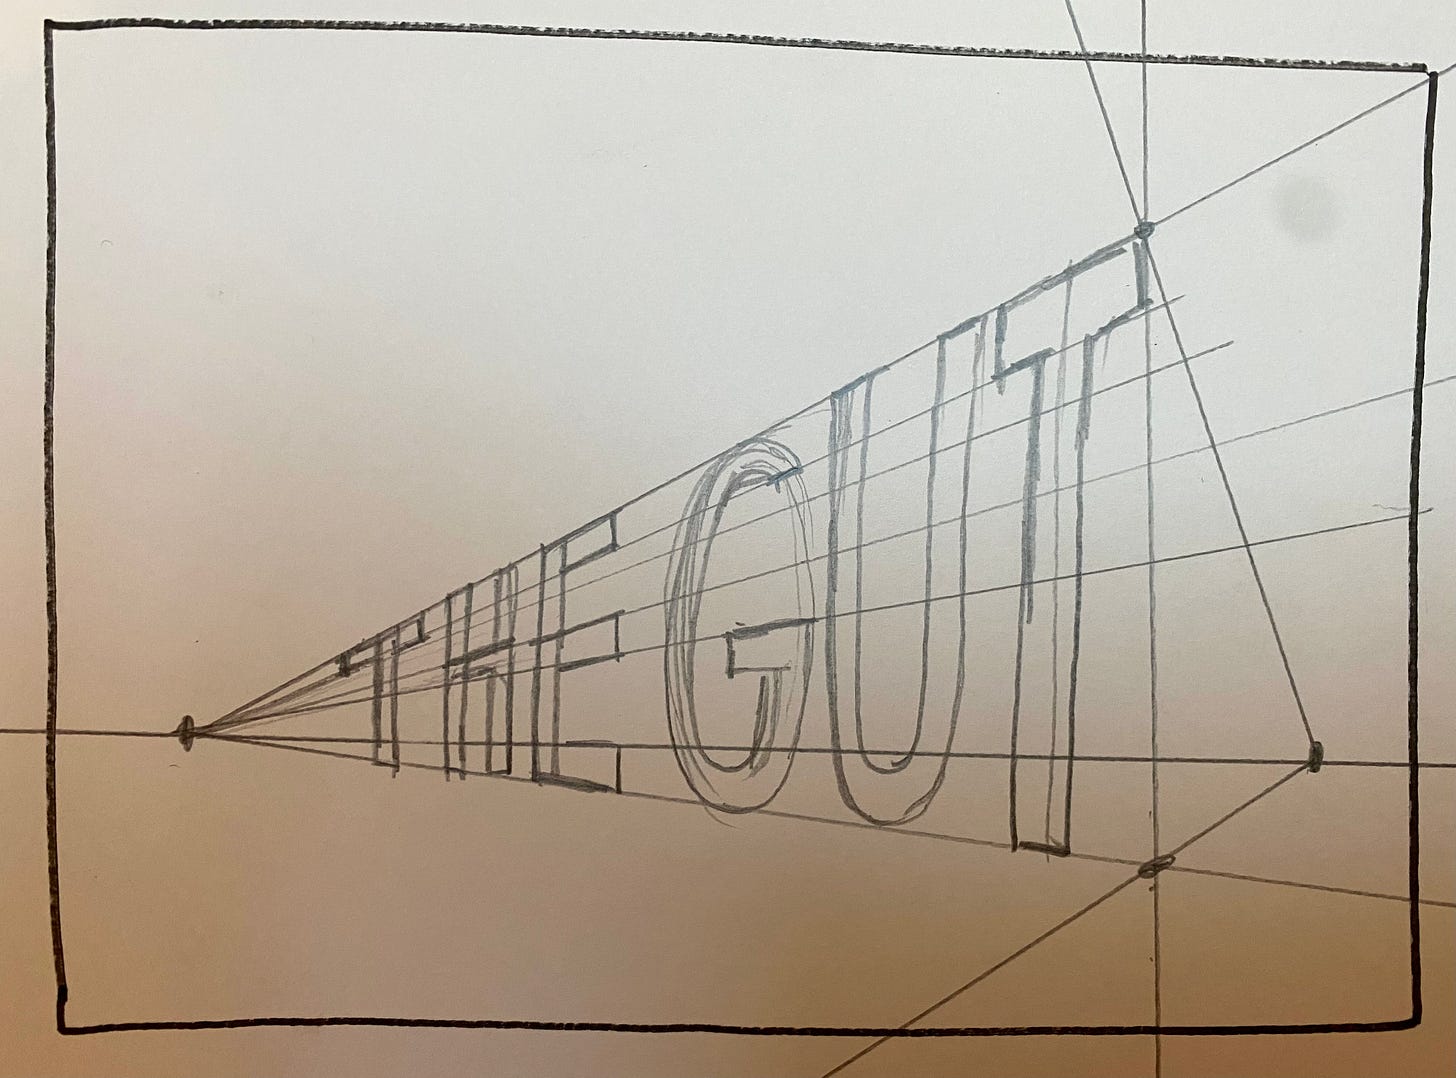
Then I drew a few more orthogonal lines and used them to write THE GUT in block letters. It’s far from perfect, but it’s close. One thing I learned here is that when we are drawing those transverse lines, they need to be STRAIGHT or it gets wonky. So using a ruler for all lines is KEY, especially when we’re learning.
Then I drew MORE orthogonal and used those as guidelines to turn it into a 3D shape. This wasn’t easy with the curves of the G, but it’s close enough. And whatever, it looks cool.
And finally, I went over the lettering lines in red pencil, erased all the orthogonal lines, leaving me with just “THE GUT.” Then I threw some color down, and added a little shading and, oooohhhh, ahhhhhh!!!!!
And that’s it! SO FREAKING FUN.
So that was a pretty epic lesson. If you have any questions or comments about what you learned (or corrections - I am not a perspective expert, I could be getting something wrong!) please throw them in the comments.
Assignment: Draw Your Dream Studio
Now it’s your turn.
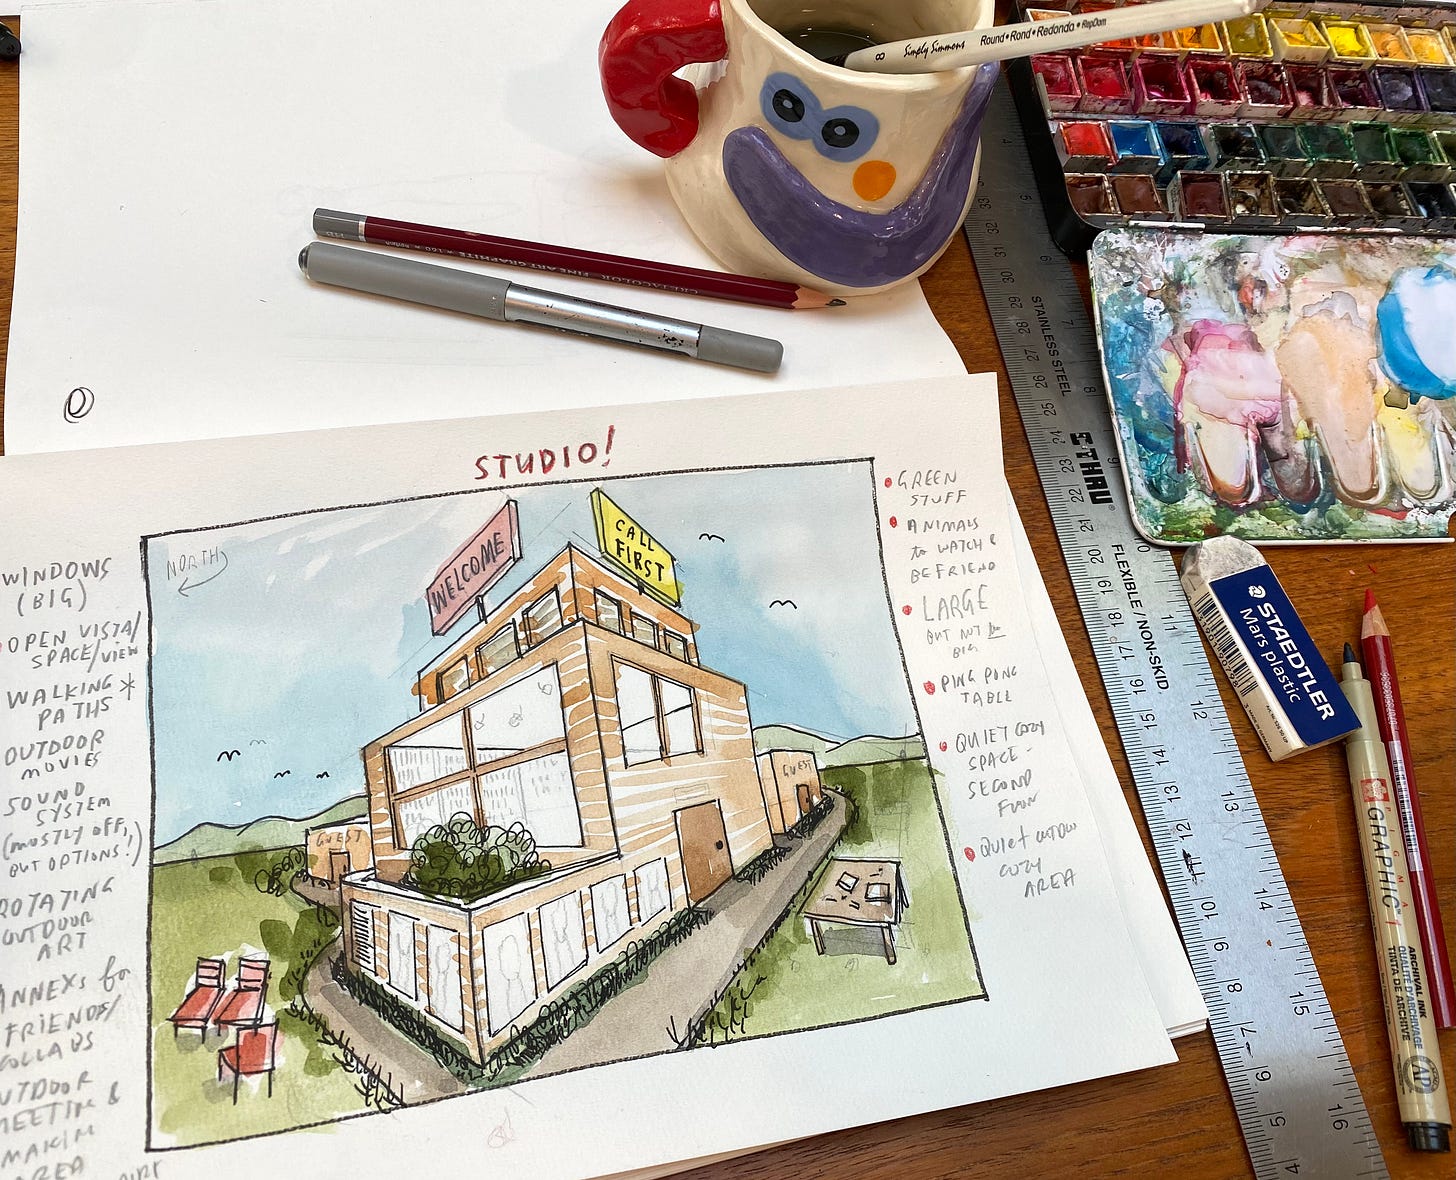
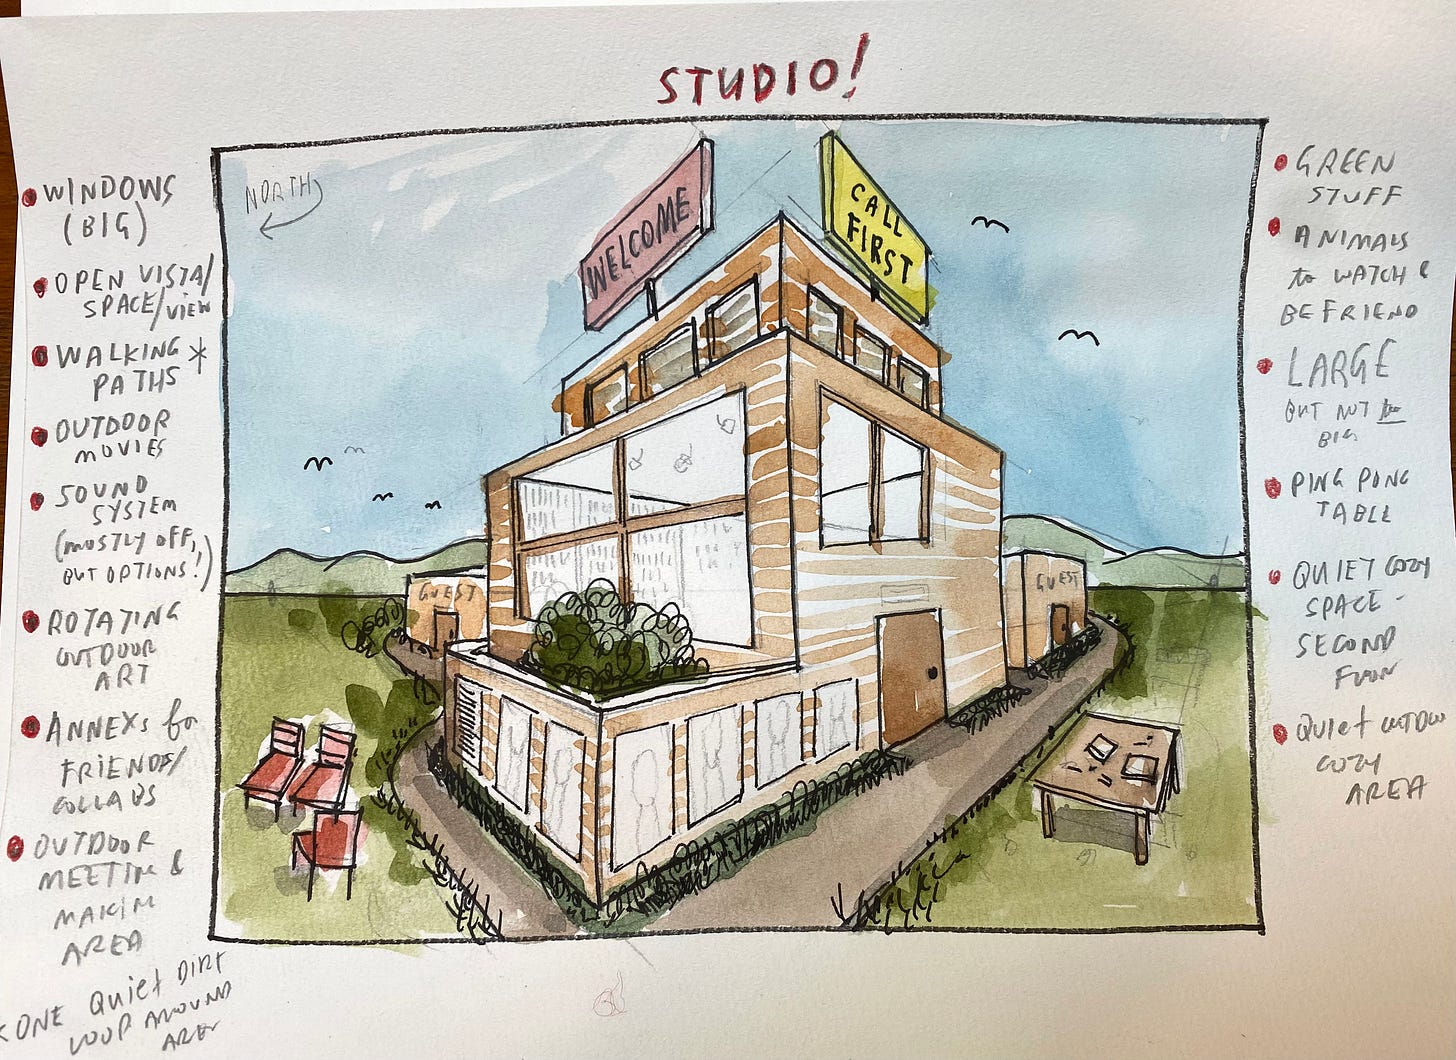
This week’s drawing assignment is to imagine your dream creative space/studio, and then draw it using two point perspective.
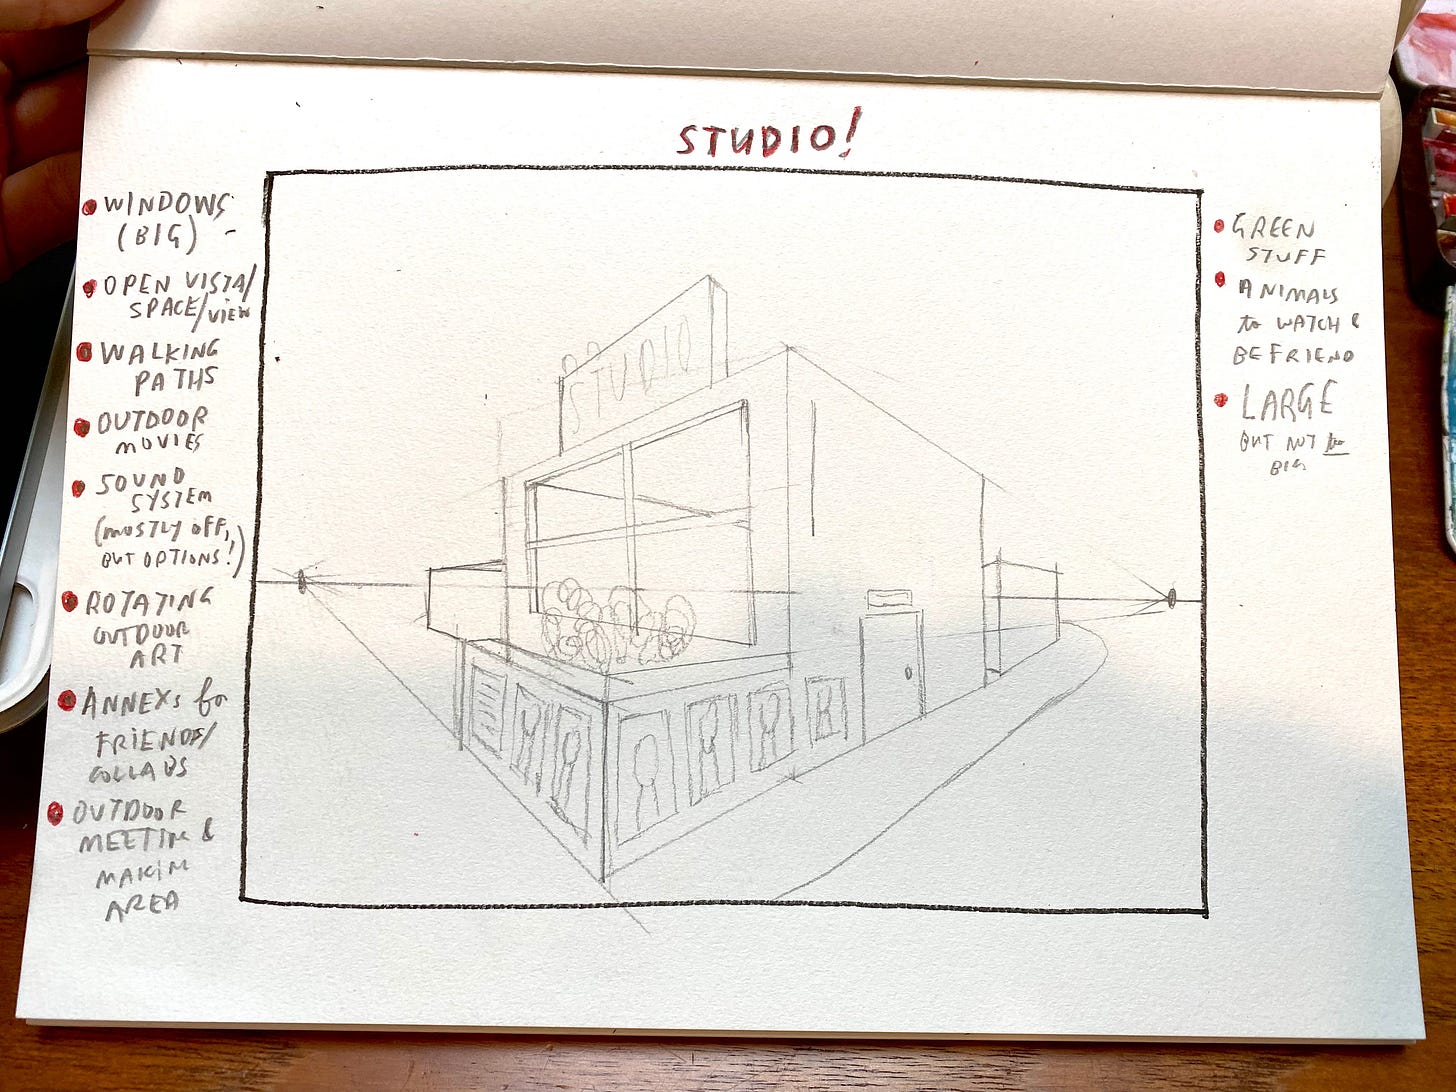
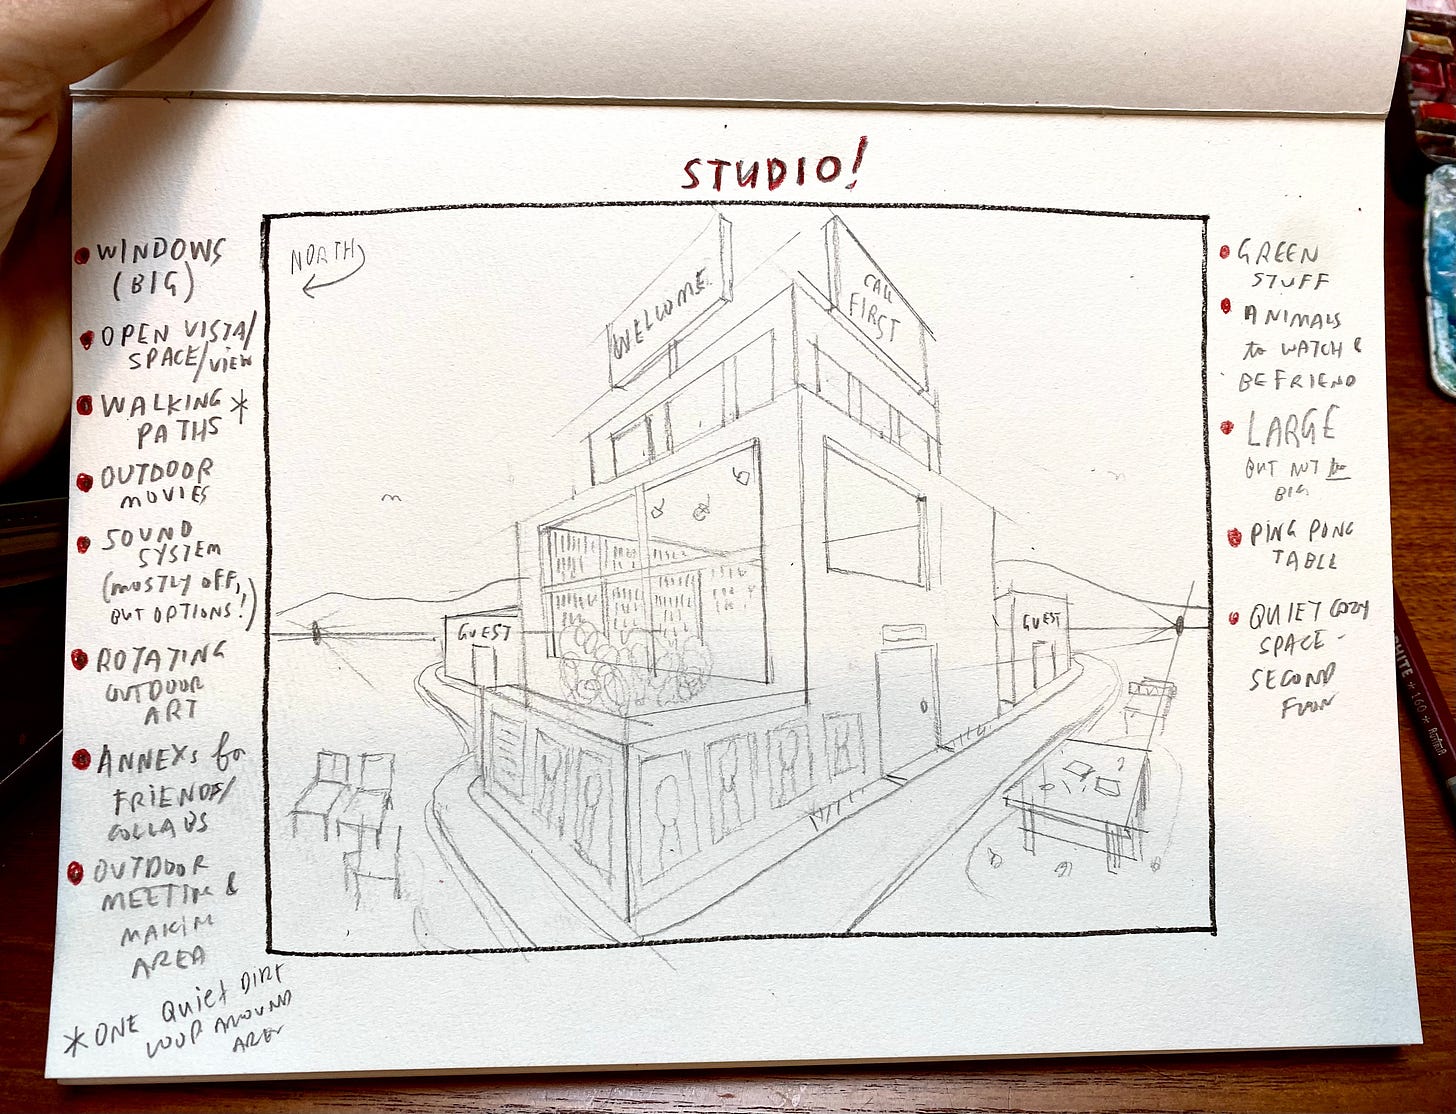
Here are a few snaps of my process below. I made a list of things I wanted before I started drawing, and then just did my best to include them in a fun way that felt free, but also used all the elements of two point perspective.
I forgot to take an early photo, but here is the drawing after I put in most of the main shapes and a few details.
And here it is more fleshed out:
And here is the near finished drawing! I still want to paint the gallery wall and the interiors, but you get the gist.
I had SO MUCH FUN doing this assignment and I think you will, too. Grab a ruler, an eraser, a pencil and some paper and draw your DREAM CREATIVE STUDIO in TWO POINT PERSPECTIVE. It’s a fun way to get to know each other’s interests and imaginations, too. As always, let’s share our drawings in the GUT Chat which is open to EVERYONE this week. If you’re confused or have questions about how to participate in the art share/chat, leave questions them in the comments below.
And with that, friends, I wish you the best week. I’m not going to include highlights from last week’s chat, but will likely send out a special email highlighting our creative studios later this week. I think they will be worth sharing. ;)
Happy two pointing, y’all!! Everything is better…
xoxo
w
Bay Area DrawTogether GUT meetup INFO:
Who? Bay Area Draw Together GUT'sters
When? Friday, October 13th from 11:30am - 1:30'ish
Where? Precita Park Cafe (500 Precita Ave, San Francisco, CA)
What to bring? Art supplies, blanket, snacks (optional)
If interested in joining, please email Anne at anne.sullivan@gmail.com for any follow-up details. Again, Anne drafted this spreadsheet as a way to collect GUT members’ contact information to help folks self-organize in person meet-ups in their local areas. Add your name if you’re interested in meeting up with other DT GUT peeps and drawing together!!
..
AND PS - thank you Kyle Ranson-Walsh for support on this week’s assignment 👍👍






Wendy has a piece in The NY Times today. Here’s a gift link: https://www.nytimes.com/2023/10/13/opinion/art-drawing-connection-strangers.html?unlocked_article_code=9OrReC_HcISt0szQUl_YISX4WLuKKiNHSut53GYvfmaZ-gIrD767gCbB9XdIa0-lzXRWhCehrqibPEK-8lB4td218f-Nkcgi_Ldv_CxyejfQ0cHVe0CY7x568yDISVX7eRWf5kQ33QuXqKA21GiOR0AsX79-_pA7PmTE0VSVRYqXZ5KrQsYdzfNn1fpkBTudBB1G1Kx0fj60hvlIhvVIY-hH_ghoCLsZjLZd2-bG9Xb6Q82iyAg280rtK7GU6kA9OLFP9BqOnTG6Bi8eB3gPXLlcQ544SvPffLeHG0YOKYgFB2BcKP8mGeWk-dPeIM0aO7d7P-VDtJU-5ZA-5BMrjJHR3vQSXc3-U8A&smid=url-share
Hello GUT Community! It’s my first visit here, although I’ve followed you, Wendy, since this all started back in 2020, and actually before that with the cookbook and How to Say Goodbye. I love art of all kinds but cannot even draw a stick figure. So nice of you to make it free for us to try out. I’m so inspired I’m already planning to pay up! Yay!
Cathy in Little Rock
P.S. What does GUT stand for?