


Hello my fine DrawTogether GUT friends!
We are thrilled by the excitement around our in-person DrawTogether event at SFMOMA on Saturday, August 9 at 2pm. If you would like to join us, make sure to RSVP, and we have all the details in our announcement from a couple days ago!
We’re back with another classic for this hot summer week!
A while ago, I did a series of lessons on pencil skills, and I wanted to bring back this lesson on shading with graphite. I always think it’s so amazing how much you can do with a simple pencil. Graphite is such an important medium in art making. It literally lays the foundation for so many other mediums we’ll explore in the future. While I know some of you prefer pens or paints (or crayons for our little art sidekicks), learning how to use graphite pencils will serve you for your lifetime in unexpected ways. And if you want to go rogue and use another medium, hey, YOU DO YOU. All I care about is that you draw this week.
This week we have a a straight-up art lesson with a little bit of heart-doodle thrown in, and it’s super fun and useful into the future. All you need is a pencil and some paper.
Let’s do it.
Pencil Skills: Shading techniques
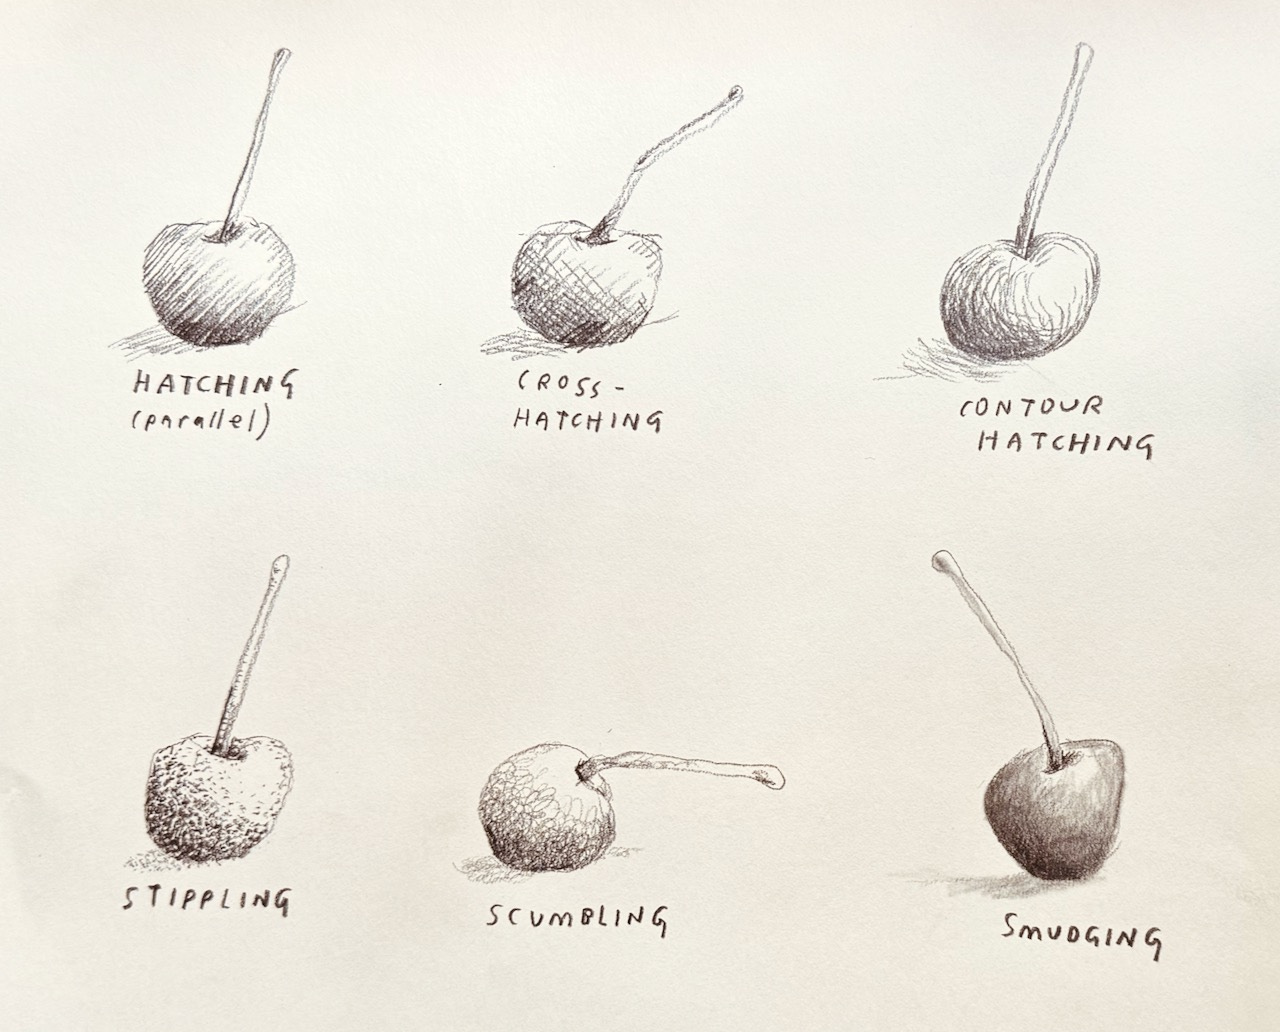
Graphite (pencil) is a great medium to use when we want to create a drawing that’s a single hue (color) and we want to use multiple values (light and dark). When we create those value changes, that’s called shading. While a pen gives us one consistent value no matter how use move it across the page, by choosing which number/letter pencil we use, we can create a huge range of light to dark with graphite pencils by pushing harder or lighter (harder = darker, lighter = well, lighter) and by creating different types of lines.
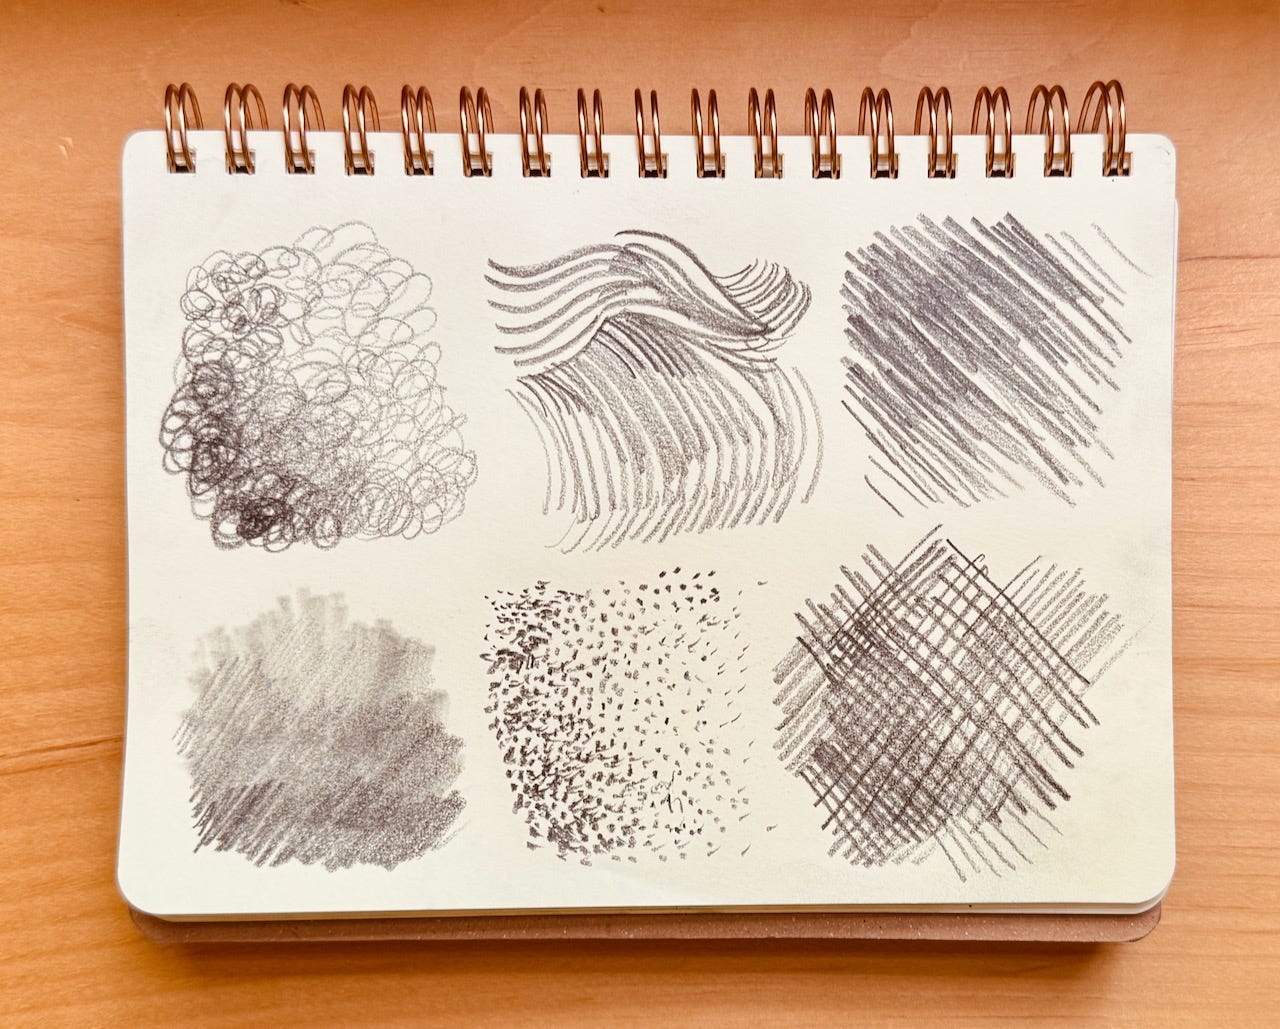
This week we are exploring how to create value through additive mark-making. Spoiler alert: Each of these techniques is basically super-deliberate doodling with a pencil. You’ll recognize some of the marks we’re making this week from artists we’ve learned about in the past: Ruth Asawa, Yayoi Kusama, Van Gogh, Cy Twombly, Miro, and more.
Ready? Let’s begin with a general category: HATCHING.
Hatching, from the term “hatch mark.” Hatch marks are lines drawn close together to form a pattern, and the density of that pattern creates a sense of value (light and dark). There are three basic ways to use hatch marks to create shading: Parallel Hatching, Cross Hatching, and Contour hatching. To start us off, here is an example of a drawing by Van Gogh in which he uses almost every darn technique we study today (mostly hatching, but check out those dots, too!)
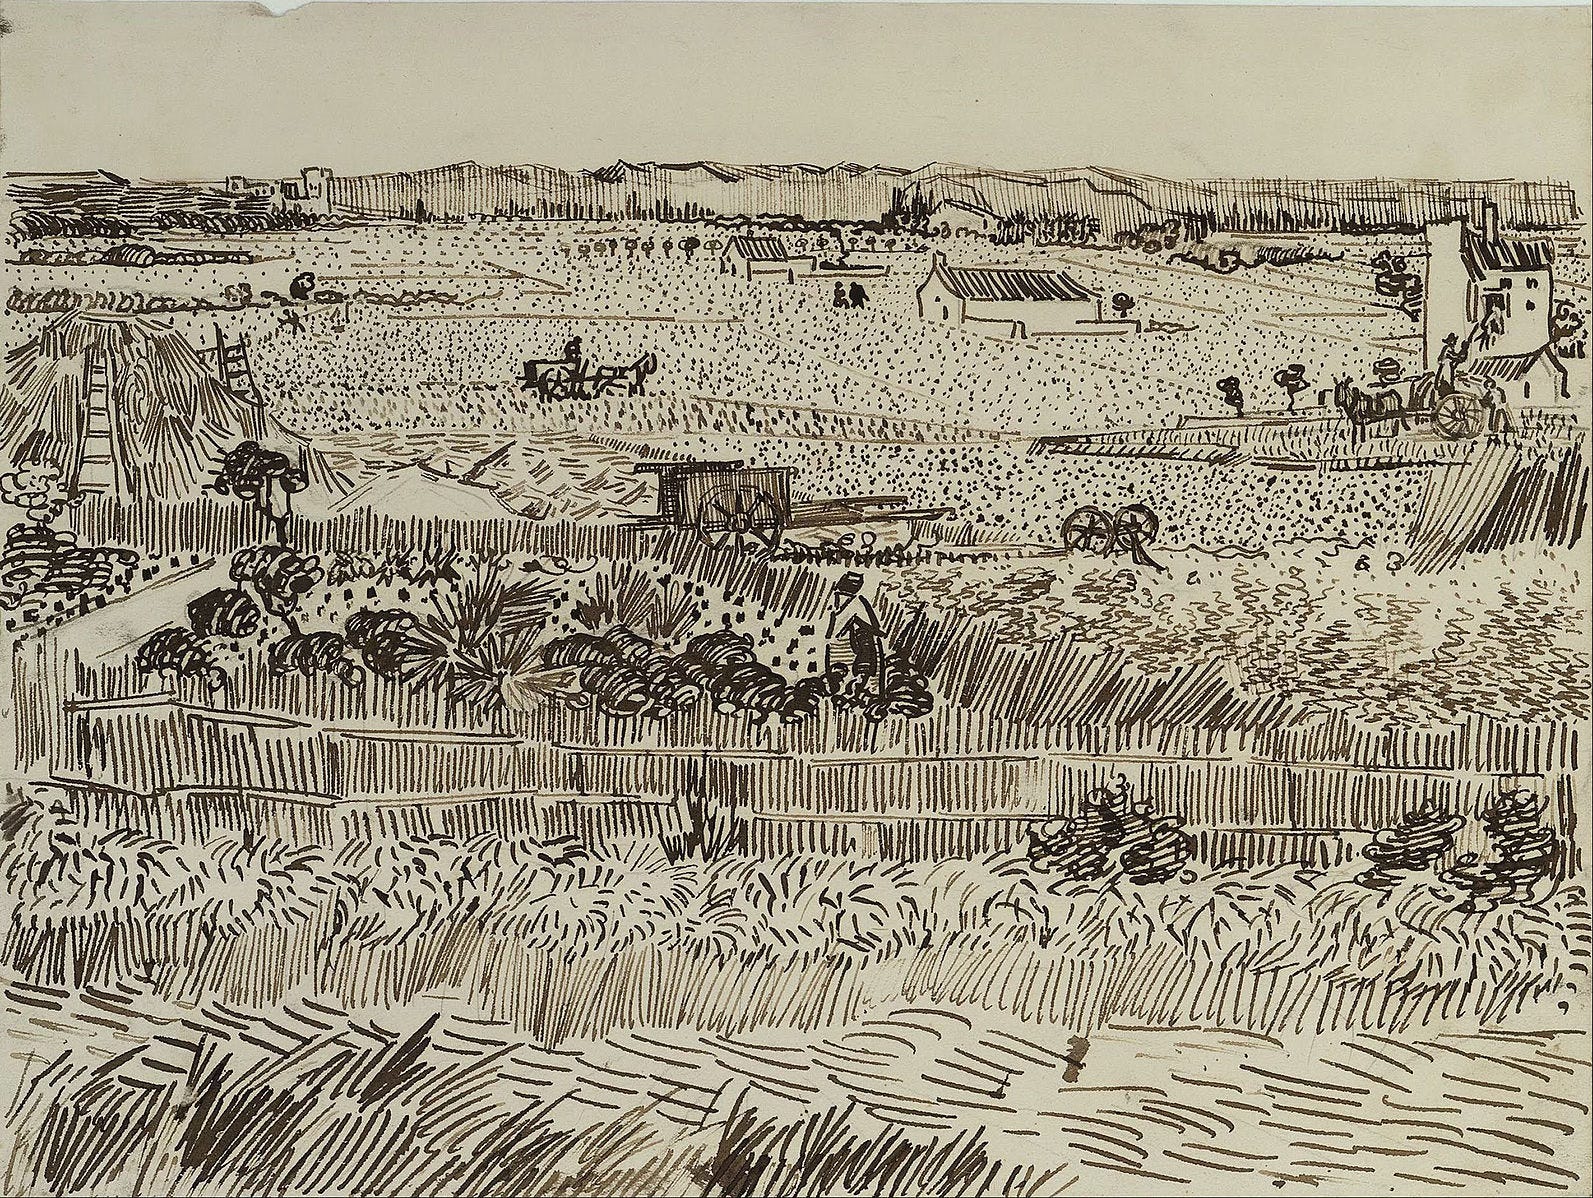
As we go through the techniques below, you can return to this image if you want and see if/where/how Van Gogh uses them, and to what effect.
Parallel Hatching
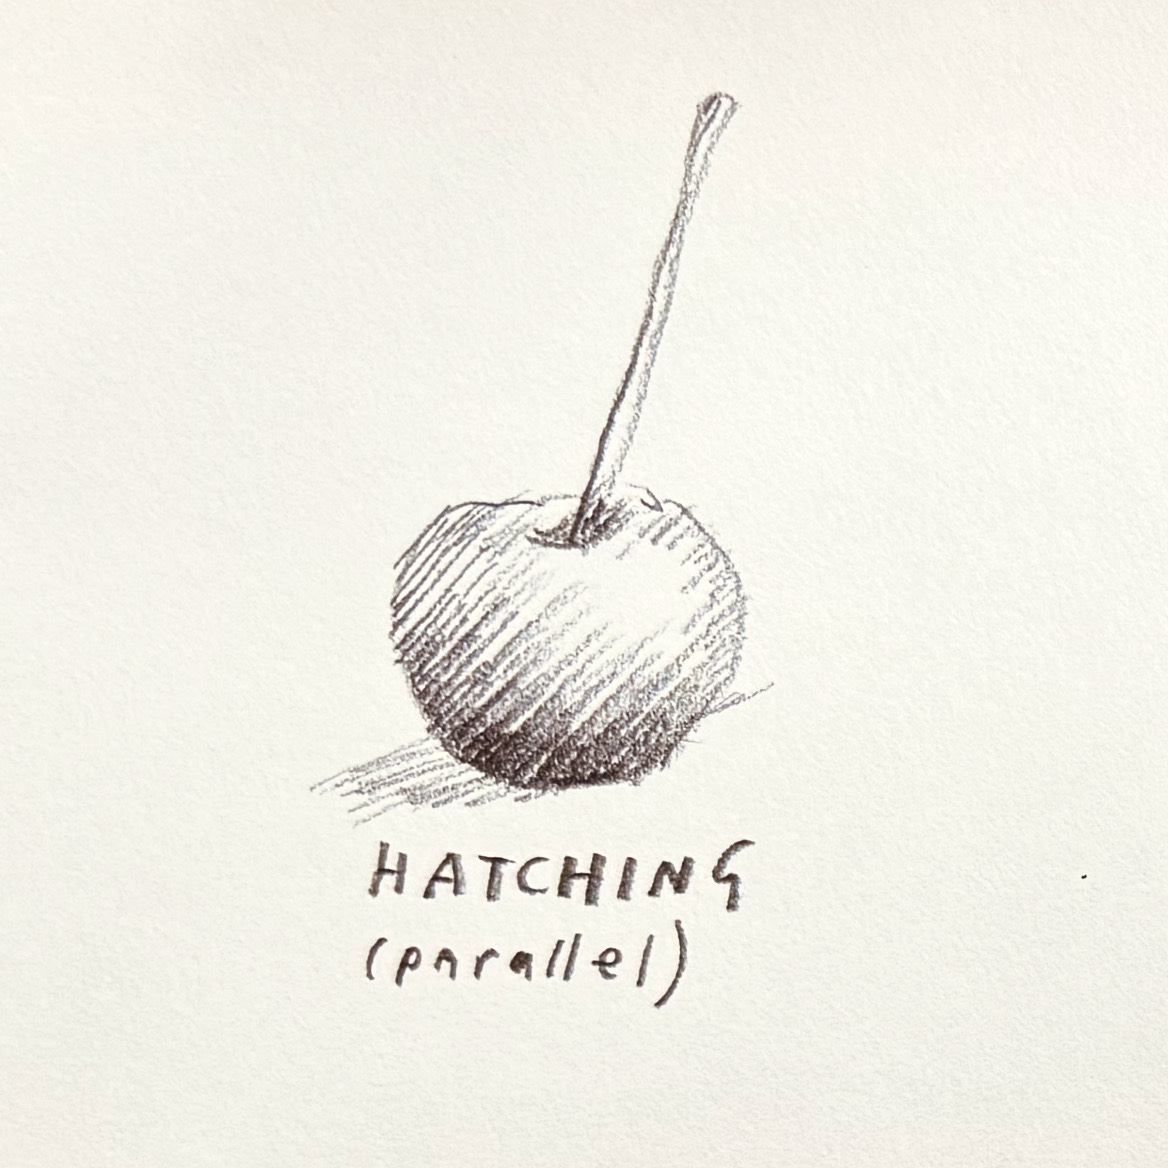
Parallel hatching is accomplished by drawing lines close together, all moving in the same direction. The spacing and layering of these parallel lines create an effect of light and dark. Here’s an example of parallel hatching in a pastel drawing by the artist Edgar Degas.
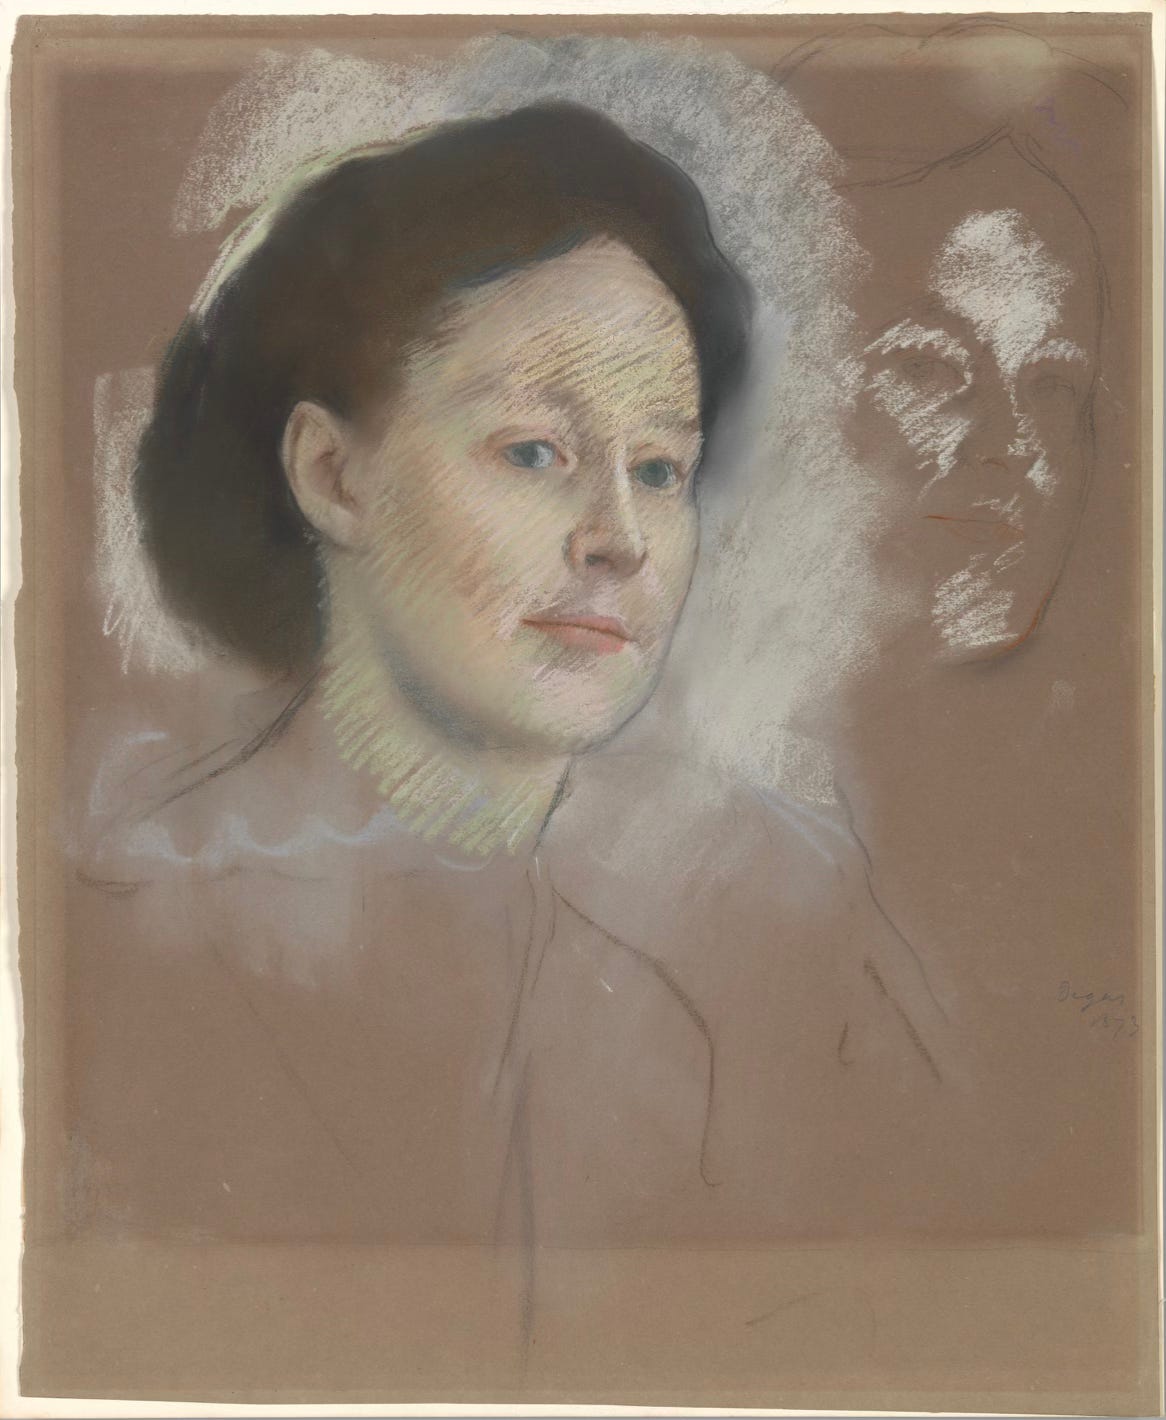
Note how the lines all move in parallel, and how that consistency ties the image together. On the right of the image you can see in the beginning sketch how he lays down the basis of his parallel hatching to start to build the figure. Also, see the background around the model’s head? Degas is using the same parallel hatching technique but using the side of the pastel to create a more general background. (Suggestion: you could try the same thing with a graphite pencil this week!)

In Van Gogh’s drawing above, you can see how he uses parallel hatching along with other hatching methods in the same drawing to build up value. In this piece, not only does he use parallel hatching in the grass below, but in the road beyond and on either side of the road he uses a technique called cross-hatching….
Cross Hatching
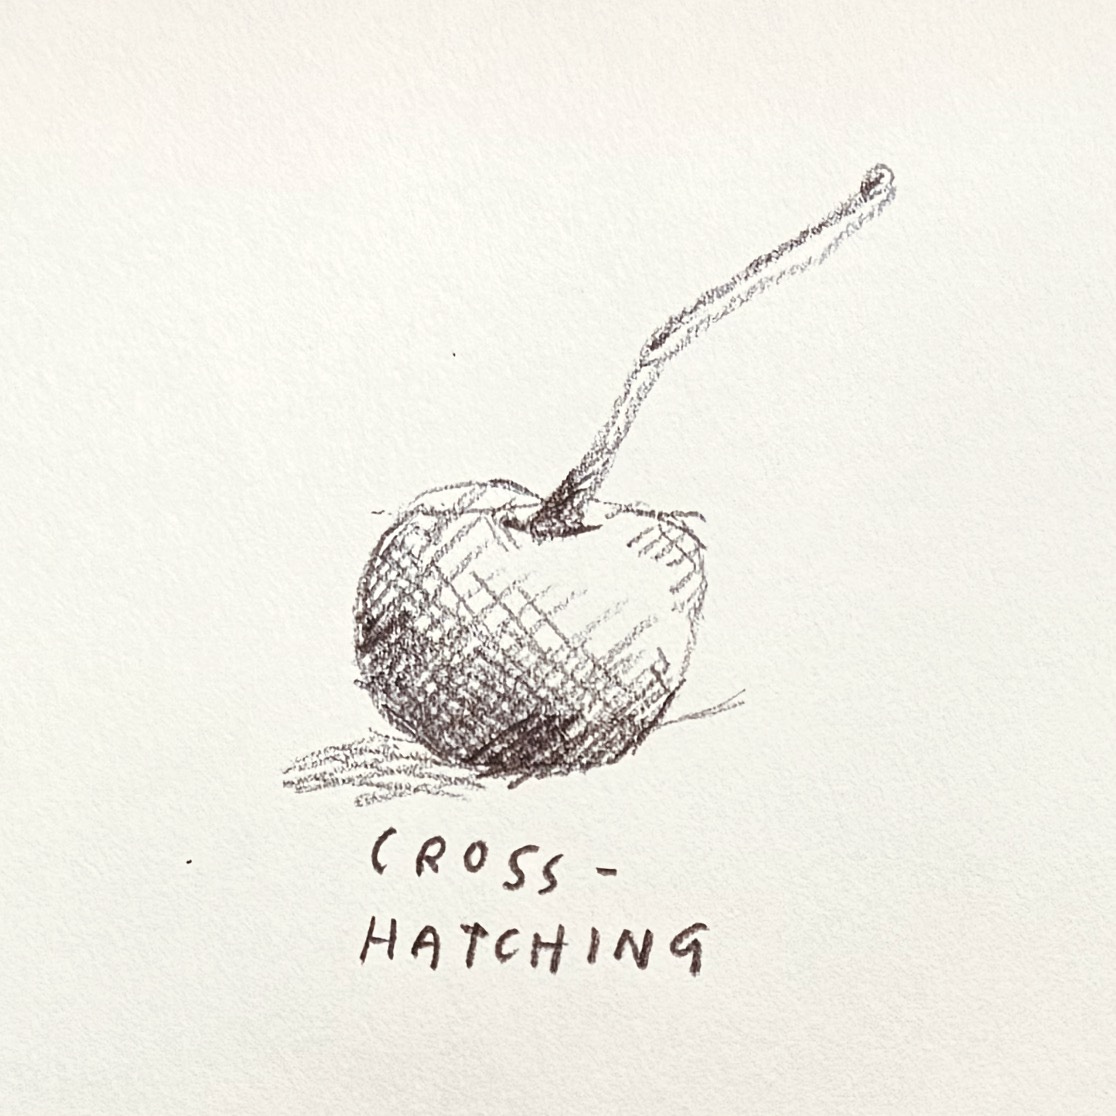
Cross hatching is like parallel hatching, but the lines are drawn perpendicular to one another. Or diagonal. Or whatever direction. But they are a series of parallel lines crossing one another to build value. The denser the cross hatching, the darker the drawing.
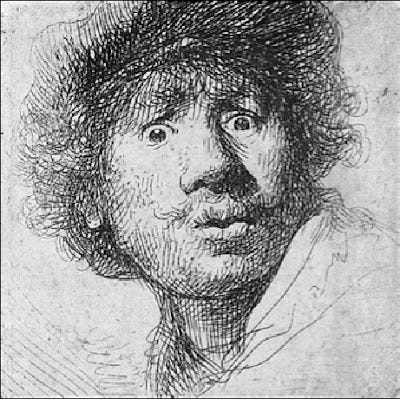
An all-time king of crosshatching is, of course, Rembrandt.
You also see cross hatching used often in comics, like ones by the phenomenal Joe Sacco and R. Crumb (tho they are generally using pen and ink.) Check out all the hatching used in Sacco’s comic below.

Also I would be remiss not to mention my pal the wonderful France Belleville-Van Stone who works almost exclusively in cross-hatching and wrote a fabulous book on sketching in this style!
Contour Hatching
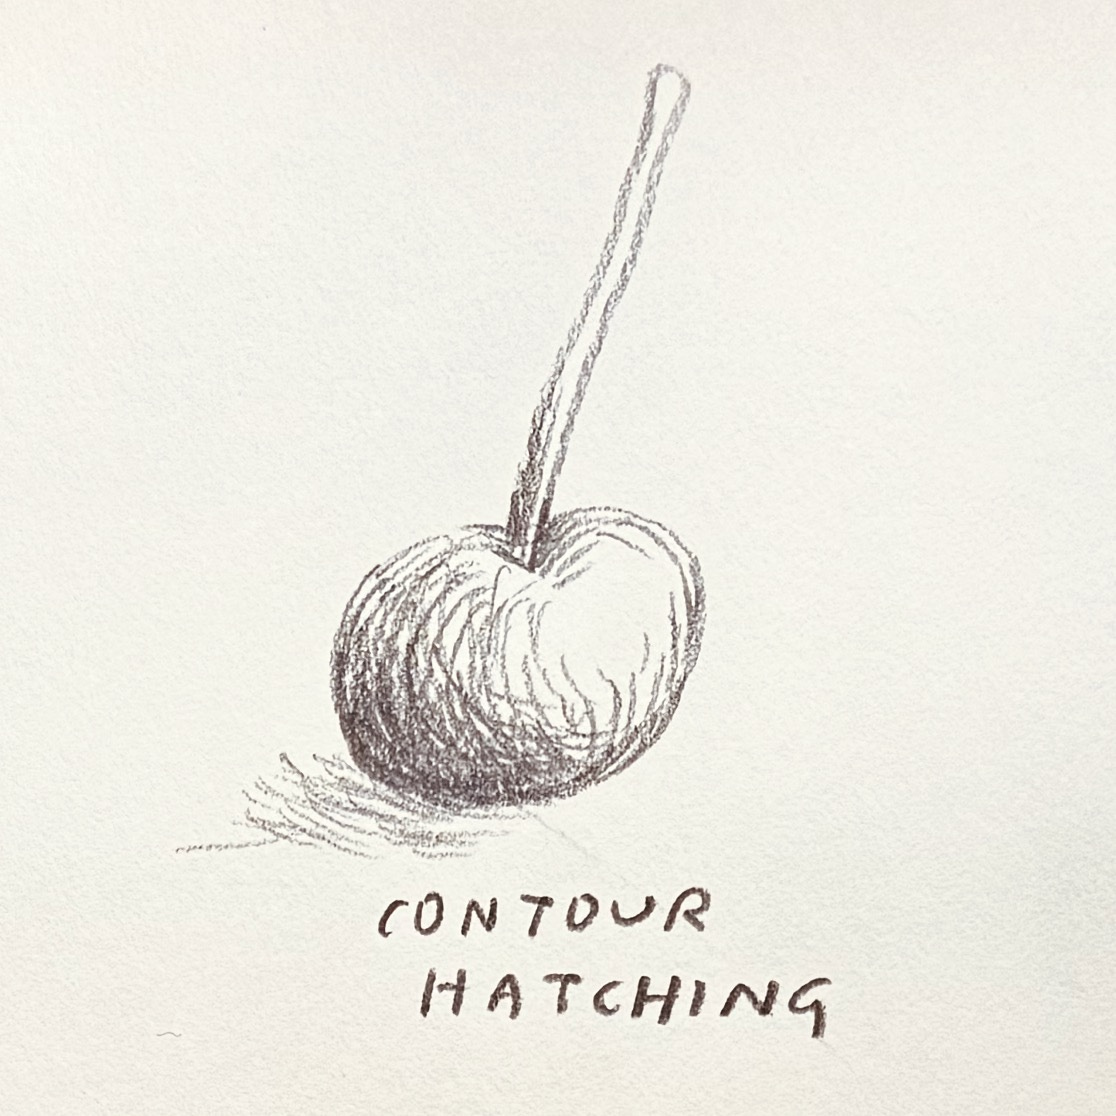
Contour hatch mark are similar to parallel hatching, but the lines follow the curves and angles of a shape, forming smooth swooping surfaces or sharply angled planes, as opposed to the more uniform, cohesive flat surfaces that parallel hatching suggests.
The artist/drawer/writer Raymond Pettibon uses this technique often in his surfing series of drawings.
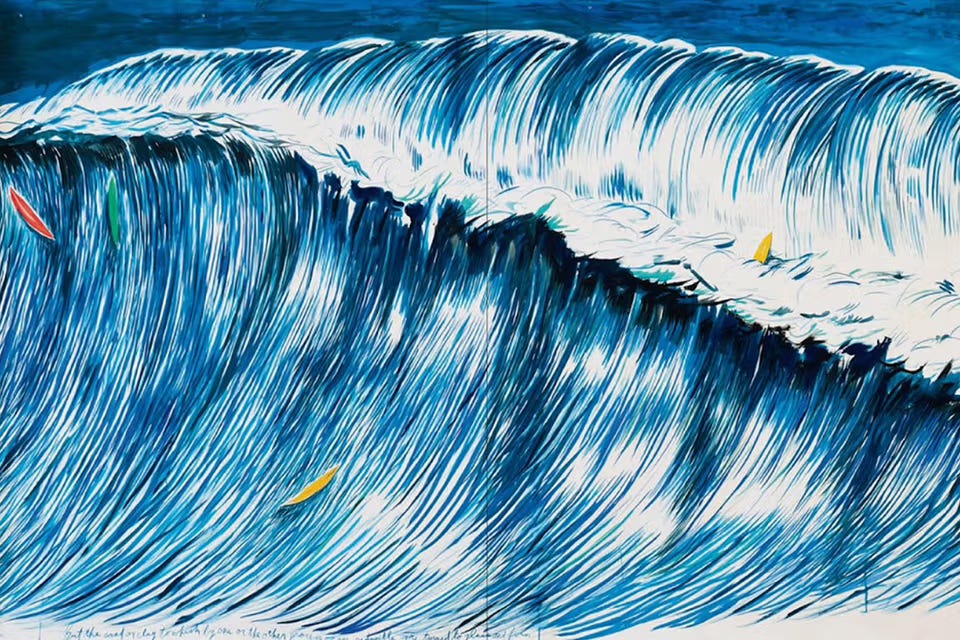
If he’d used parallel or cross hatching the drawing wouldn’t have the same sense of curve and motion. The contour hatching creates shape, value and movement.
Stippling
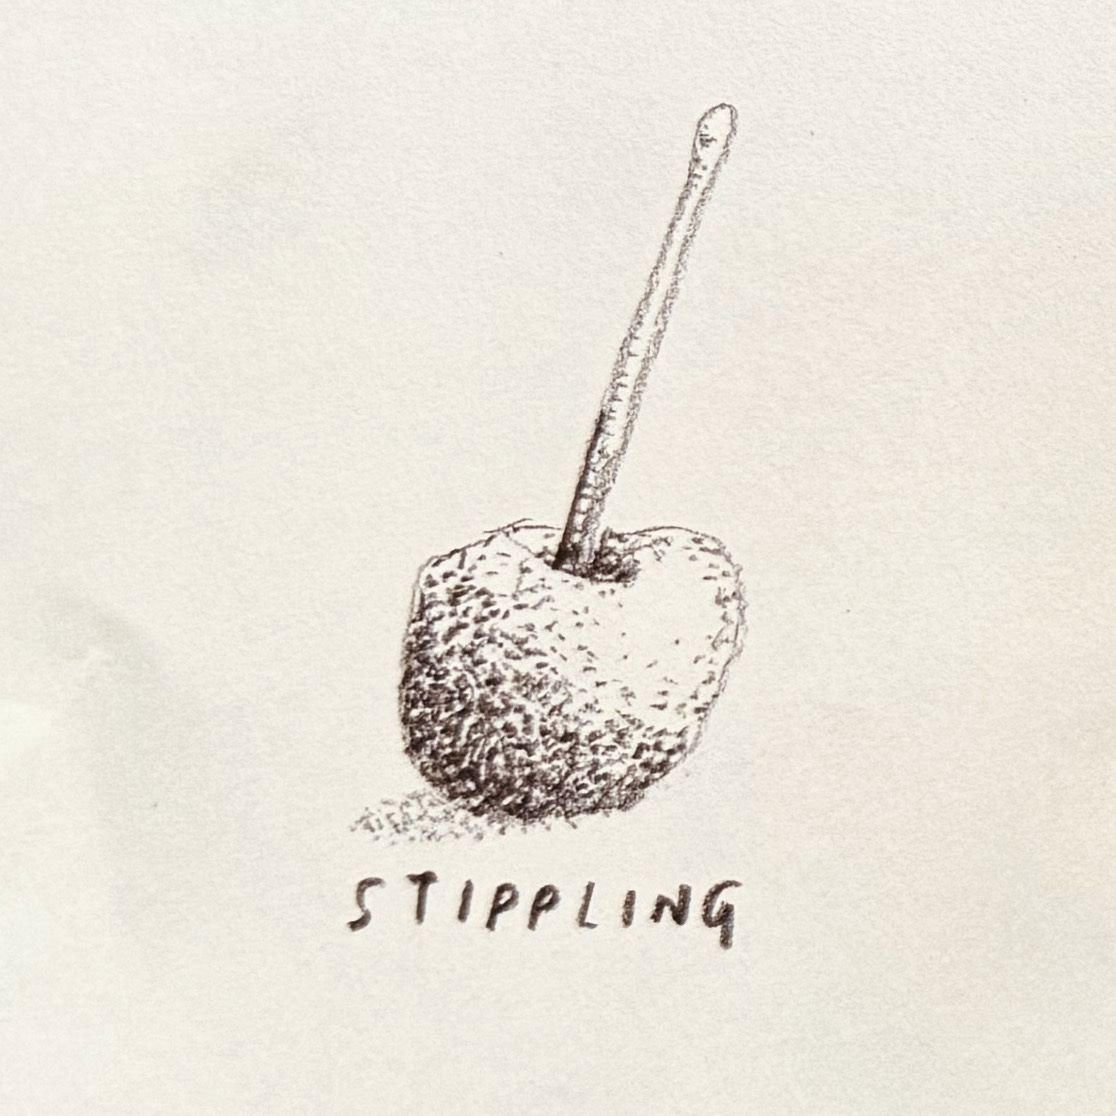
This one takes time and patience, and it’s also incredibly meditative and the results are stunning. Stippling was originally developed as an engraving technique. It is a lot like the painting in pointillism, but in our case you’re only using one color, and that color is GRAPHITE.
To stipple with graphite…
